Month: August 2014

The Formal Definition of the Derivative, or Why Holes Matter

Lucky you! Two calculus posts in one day. Mainly because I don’t want some of these ideas to disappear in my hiatus from teaching it. This one deals with our favorite topic: the formal definition of the derivative.

\lim_{h \rightarrow 0}\frac{f(x+h)-f(x)}{(x+h)-(x)}

I see that expression and my mind goes to the following places:

  • Doing a bunch of tedious algebraic calculations for a particular function in order to find the derivative.
  • I “see” in the expression the slope of two points close together.
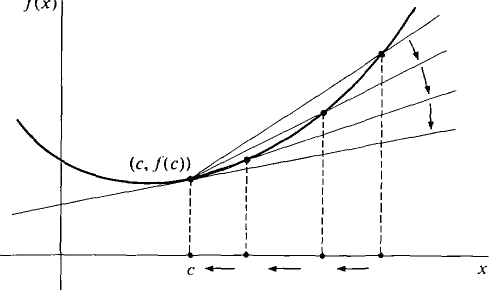
  • I envision the following image, showing a secant line turning into a tangent line
    zzzz

And I think for many teachers and most calculus students, they think something similar.

However I asked my (non-AP) calculus kids what the h stood for. Out of two sections of kids, I think only one or two kids got it with minimal prompting. (Eventually I worked on getting the rest to understand, and I think I did a decent job.) I dare you to ask your kids and see what you get as a response.

What I suspect is that kids get told the meaning of \lim_{h \rightarrow 0}\frac{f(x+h)-f(x)}{(x+h)-(x)} and it gets drilled into their heads that they might not fully understand what algebraically is going on with it.

It was only a few years ago that I came to the conclusion that even I myself didn’t understand it. And when I finally thought it all through, I came to the conclusion that all of differential calculus is based on the question: how do you find the height of a hole? I started seeing holes as the lynchpin to a conceptual understanding of derivatives. I never got to fully exploit this idea in my classes, but I did start doing it. It felt good to dig deep.

The big thing I realized is that I rarely looked at the formal definition of the derivative as an equation. I almost always looked at it as an expression. But if it’s an equation…

f'(x)=\lim_{h \rightarrow 0}\frac{f(x+h)-f(x)}{(x+h)-(x)}

… what is it an equation of? An equation with a limit as part of it?! Let’s ignore the limit for now.

Without the limit, we have an average rate of change function, between (x,f(x)) and (x+h,f(x+h)). And since we have removed the limit, we really have a function of two variables.

AvgRateOfChange(x,h)=\frac{f(x+h)-f(x)}{(x+h)-(x)}

We feed an x and h into the function, and we get an output of a slope! It’s the slope between (x,f(x)) and (x+h,f(x+h))!

Let’s get concrete. Check out this applet (click the image to have it open up):

zzzzz1

On the left is the original function. We are going to calculate the “average rate of change function” with an x-input of 1.64 (the x-value the applet opens up with).We are now going to vary h and see what our average rate of change function looks like: f(1.64,h)=\frac{f(1.64+h)-f(1.64)}{h}. That’s what the yellow point is.

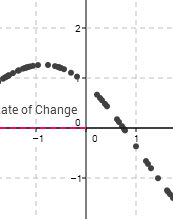
Before varying h, notice in the image when h is a little above 2, the yellow “Average Rate of Change” dot is negative. That’s because the slope of the secant line between the original point (1.64, f(1.64)) and a second point on the function that is a little over 2 units to the right is negative. (Look at the secant line on the graph on the left!)

Now let’s change h. Drag the point on the right graph that says “h value.” As you drag it, you’ll see the second point on the function move, and also the yellow point will change with the corresponding new slope. As you drag h, you’re populating points on the right hand graph. What’s being drawn on the right hand graph is the average rate of change graph for all these various distances h!

Here’s an image of what it looks like after you drag h for a bit.

zzzzz2

Notice now when our h-value is almost -3 (so the second point is 3 horizontal units left of the original point of interest), we have a positive slope for the secant line… a positive average rate of change.

The left graph is an x-f(x) graph (those are the axes). The right graph is a $h-AvgRateOfChange$ graph (those are the axes).

Okay okay, this is all well and dandy. But who cares?

I CARE!

We may have generated an average rate of change function, but we wanted a derivative function. That is when h approaches 0. We want to examine our average rate of change graph near where h is 0. Recall the horizontal axis is the h-axis on the right graph. So when h is close to 0, we’re looking at the the vertical axis… Let’s look…

zzzzz3 Oh dear missing points! Why? Let’s drag the h value to exactly h=0.

zzzzz4

The yellow average rate of change point disappeared. And it says the average rate of change is undefined! 0/0. We have a hole! Why?

(When h=0 exactly, our average rate of change function is: \frac{f(x+0)-f(x)}{(x+0)-x} which is 0/0. YIKES!

But the height of the hole is precisely the value of the derivative. Because remember the derivative is what happens as h gets super duper infinitely close to 0.

We can drag h to be close to 0. Here h is 0.02. zzzzz5

But that is not infinitely close. So this is a good approximation. But it isn’t perfect.

And this is why I have concluded that all of differential calculus actually reduces to the problem of finding the height of a hole. 

Here are three different average rate of change applets that you might find fun to play with:

one (this is the one above)     two     three

In short (now that you’ve made it this far):

  • Look at the formal definition of the derivative as an equation, not an expression. It yields a function.
  • What kind of function does it indicate? An average rate of change function. And in fact, thinking deeply, it actually forces you to create a function with two inputs: an x-value and an h-value.
  • Now to make it a derivative, and not an average rate of change, you need to bring h close to 0.
  • As you do this, you will see you create a new function, but with a hole at h=0.
  • It is the height of this hole that is the derivative.

 PS. A random thought… This could be useful in a multivariable calculus course. Let’s look at the average rate of change function for f(x)=x^2:

AverageRateofChange(x,h)=\frac{(x+h)^2-x^2}{h}

Let’s convert this to a more traditional form:

z=\frac{(x+y)^2-x^2}{y}

Now we have a function of two variables. We want to find what happens as h (I mean y) gets closer and closer to 0 for a given x-value. So to do this, we can just visually look at what happens to the function near y=0. Even though the function will be undefined at all points where y=0, visually the intersection of the plane y=0 and the average rate of function should carve out the derivative function.

If this doesn’t make sense, I did some quick graphs on WinPlot…

This is for f(x)=x^2. And I graphed the plane where y=0. We should get the intersection to look like the line f'(x)=2x.

zzsine

Yup. Cool.

I did it for f(x)=\sin(x) also… The intersection should look like f'(x)=\cos(x).

zzsine2

u-substitution, visually

I created some calculus Geogebra applet thingies last summer that I wanted to use last year. Alas, time ran short and we never got to use them. However since I’m no longer teaching calculus (at least not next year), I figured I’d throw them up in case anyone else out there finds them useful.

They deal with u-substitution. I’ve always had a problem with teaching it. Here’s how it goes… You have some integral in terms of x. You convert all the xs and dxs into us and dus. And viola! It works out. It’s very powerful. And it’s procedural. And kids have throughout the years learned this “substitution”-y thing works [1]. So kids tend to like it.

But here’s the thing. For my kids, it’s just a random method to evaluate an integral. They don’t conceptually understand what is going on… what this changing of variables is doing.

When I thought deeply about this, I realized what truly is happening is that we are transforming space… From the x-f(x) plane to a much convoluted u-f(u) plane. But it is through our particular choice of u that makes the change in space beautiful, because it turns something that looks particularly nasty and converts it into something that looks rather nice. Ish.

Here is a screenshot from one of my geogebra applets illustrating this (you can click on the screenshot to be taken to the applet):

usub1

We start with a pretty ugly function that we’re integrating. But by using this substitution to morph space, we end up with a much nicer function. I mean, throw both of these up and ask your kids — which one of these would they rather find the integral of. They’ll say the one on the right! The u-substitution one. Although not perfect [2], it’s pretty kewl.

The applets are here:

One     Two     Three     Four     Five

And the applets are dynamic! You can change the lower and upper bounds on the x-f(x) graphs and the lower and upper bounds automatically change on the u-f(u) graph! But because math is awesome, the areas are preserved!

Some things I maybe would have done with the applets in my class:

  • Let kids play with the applets and get familiar with them.
  • For the first applet (starting simple), have kids count the boxes and estimate the area on one graph, and then do it on the other (careful though! the gridlines are different on the two graphs!). Whoa, they are always the same!
  • For the first applet (again, starting simple), ask them to drag the upper limit to the left of the lower limit. Explain what happens and why.
  • The second applet is my favorite! Put the lower limit at x=0. Drag the upper limit to the right. Explain what is happening graphically — and that tie that graphically understanding to the particular u-substitution chosen.
  • In the second applet, can students find three different sets of bounds which give a signed area of 0?
  • In the fourth applet, have students put the lower and upper bounds on x=6 and x=7. Have them calculate the average height of that function in that interval (the area is given!). Do they have visual confirmation of this average height for this interval?Now Looking at the u-graph, the bounds are now u=8 and u=10. Have them estimate the average height of that function in that interval (again, the area is given)! (The average height “halves” in order to compensate for the wider interval. It has to since the areas must be the same) Have students do this again for any lower and upper bounds for this graph. It will always work!
  • In the fifth applet, have students put the lower bound at x=0, and have them drag the upper bound to the right. What can they conclude about the areas of each of the pink regions on the x-f(x) graph? (Alternatively, you can ask: you can see from the u-f(u) graph that the signed area on the original graph will never get bigger than 1, no matter what bounds you choose. Try it! It is impossible! Armed with that information, can you conclude about the pink regions in original graph?)

I’m confident I had more ideas about how to use these when I made them [3]. But it was over a year ago and I haven’t really thought of them since. But anyway, I hope they are of some use to you. Even if you just show them to your kids cursorily to illustrate what graphically is going on when you are doing u-substitution. 

 ***

[1] Though I bet if you asked a class why they can use “substitution” when solving a system of equations, what the reasoning is behind this method, they might draw a bit of a blank… But that’s neither here nor there…

[2] What would actually be perfect would be a copy of individual Riemann Sum rectangles from the x-f(x) graph “leaving” the first graph, then in front of the viewer stretching/shrinking their height and width for the appropriate u-f(u) graph, and then floating over to the u-f(u) graph and placing itself at the appropriate place on the u axis. And then a second rectangle does that. And a third. And a fourth. You get the picture. But even though the height and width morph, the area of the original rectangle and the area of the new rectangle will be the same (or to be technical, very very close to the same, since we’re just doing approximations). In this sort of applet, you’d see the actual morphing. That’s what is hidden in my applets above. But that’s actually where the magic happens!

[3] I recall now I was going to make kids do some stuff by hand. For example: before they use the applets, kids would be given lower and upper x-bounds, and asked to calculate lower and upper u bounds. And then use the applets to confirm. Similarly, given lower and upper u-bounds, calculate lower and upper x-bounds. Use the applets to confirm.

Some Geogebra Fun

I have an awesome friend and colleague at my school who is a geogebra master. He has started keeping a blog — Geogebrart — posting fairly frequently some stunning, jaw-drapping mathematical art he created using this powerful program.  Check this recent one out — which happens to be one of my favorites! Dualities!

whatwhat

Although I know most of the basics of Geogebra, I have not yet progressed to the stage passed “novice.” However I really want to get there, because this program is so freaking awesome.

When I was at TMC14 this summer, there was a sesh run by John Golden, Audrey McLaren, and Jedidiah Butler. They are like Jedi masters of Geogebra (though I know Audrey will play coy and say she isn’t…). When I was there, I learned about conditional objects, and it was awesome. (The google doc they used to help people out is here.) In about 30 minutes, with the help of John Golden and some kind people near me, I was able to make a rinky-dinky geogebra file which has a triangle on it, and has three points on the three different sides. When you drag each point close to where an altitude of the triangle would hit that side, I had something like “WOW!” or “YOU DID IT!” pop up! And if you got all three points close, something like “ALL THREE?! YOU’RE A SUPERSTAR!” show up.

Okay, okay, I wasn’t going to show you it because it’s sooooo dumb. But heck, whatever, here it is. Click on the image to check it out.

triangle

Okay, you and me, we both know that file is totally useless a teaching tool. And it is gross looking. By all accounts, I should not be excited by it. But the weird thing was: I was really proud of it, and I wanted to show everyone around me what I created. Even though I know it was simplistic and useless, I wanted to create a file that did X and I was able to do it! Although it felt dumb to get psyched about it, I was so excited that I could create something that would do what I wanted it to — that I couldn’t do before!

Today I was again inspired by my colleague and friend’s geogebra art, so I wanted to create some of my own.

I was quickly able to make this in 10 minutes [click on the picture to go to the file and mess around with the parameters! cool things happen!]

zzz1My goal was to define a curve parametrically and then have — at a ton of points on the curve — a circle to be drawn so it would look like a tube. That ended up looking only moderately neat. So I changed it so that as one traveled on the parametric curve drawing the circles, the radius of the circles would change (based on some formula I fed it). The reason this wasn’t so hard for me? I knew all the commands to do this except for the parametric curve command, which was easy to figure out.

But then I wanted to try my hand at something that would take more than 10 minutes and that would challenge me. I wanted to have something “show” a sphere via the animated drawing of “slices” (ellipses). It was inspired by this beautiful gif, but I knew that was going to be too hard for me to start out with. So I decided I would start out with a simple sphere with slices going horizontally and vertically, with no rotation.

After somewhere between 90 and 120 minutes, I did it! (You can click on the gif to go to the file and play around with some of the parameters.)

zzzspheregifAlthough the image isn’t as cool as the one that took me 10 minutes to create, I’m way prouder of this. It is because it took a ton of learning and trial and error in order to figure out how to do this. The set of problems I encountered and somehow figured out:

  • I know how to create a single ellipse in the center of the circle, but how do I make another ellipse a certain distance away that still only touches the edge of the circle?
  • How do I make the ellipses “width” (minor axis) decrease so that it is fattest near the equator, and almost like a line near the poles of the sphere?
  • Without manually typing a zillion ellipses, how do I tell Geogebra to create all the vertical ellipses at once, and all the horizontal ellipses at once?
  • The way I was generating the ellipses resulted in a problem… once an ellipse “hit the pole”(became a point), it would turn into a hyperbola. So I needed to find a way to make sure that once an ellipse “hit the pole” it would disappear.

I figured all this stuff out! So even though the sphere doesn’t look nearly as cool as I’d like, I feel so much more accomplished for it than with the super-cool-looking circles of variable radii drawn on a parametrically-defined curve.

***

Note: it’s amazing how “simple” this sphere image is once you figure it out. Once you create three sliders:

t goes from -5 to 5 [incriments of 0.1]
StepSize1 goes from 0.05 to 2 [increments of 0.05]
StepSize2 goes from 0.05 to 2 [increments of 0.05]

and you enter the following two (that’s it!) geogebra commands:

Sequence[If[abs(t – n StepSize) < 5, x² / (25 – (t – n StepSize)²) + (y – t + n StepSize)² / (1 – sgn(t – n StepSize) (t – n StepSize) / 5)² = 1], n, -5 / StepSize 2, 5 / StepSize 2, 1]

Sequence[If[abs(t – k StepSize2) < 5, (x – t + k StepSize2)² / (1 – sgn(t – k StepSize2) (t – k StepSize2) / 5)² + y² / (25 – (t – k StepSize2)²) = 1], k, -5 / StepSize2 (2), 5 / StepSize2 (2), 1]

Then you’re done! Well, you should animate the t-slider to make it cycle through everything without you having to drag the slider!

Seriously, two commands, that’s all it takes. But hopefully from the commands themselves you can understand why it would take me so long to figure out…