Geometry

Fire Hydrants

In Geometry, we have seen the importance of the perpendicular bisector. It’s kinda amazering! And before we delve too far into rotations of figures (which, again, have a lot to do with perpendicular bisectors), my co-teacher and I wanted to do some sort of investigation.

Now, after doing this, I can see what I did as being something that could introduce the awesomeness of the perpendicular bisector. It could be our anchor problem. However, we had already introduced it. So I thought this little aside would be a fun solidification of what we’ve already learned.

(To be clear, students have learned that the perpendicular bisector of a segment is the set of all points that are equidistant from the endpoints of the segments, that the three perpendicular bisectors of the sides of any triangle meet at one intersection point, and that one intersection point is the center of the circle containing all three vertices of the triangle)

Here’s the problem I gave them… however to turn them off the scent of the perpendicular bisector, beforehand I said “okay, class, now we’re doing to go on a little diversion…Here are 4 fire hydrants”

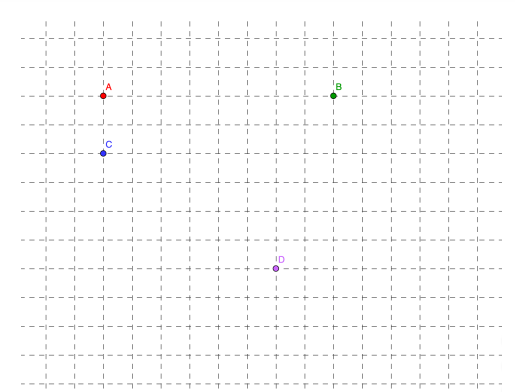
Let’s say there were fires at these four yellow locations. Which is the closest fire hydrant to each?

Okay! Some are easy to just “see” and some might require some calculations.

So next I asked students to try to color in the picture with all locations which are closest to Hydrant A, all locations which are closest to Hydrant B, all locations which are closest to Hydrant C, and all locations which are closest to Hydrant D.

Unsurprisingly, students filled in the edges of the diagram first (so the top left area was all A, the top right area was all B, etc.).

Unsurprisingly, eventually all students asked “what if a location is the same distance to two hydrants?” (I said you could just color that black.)

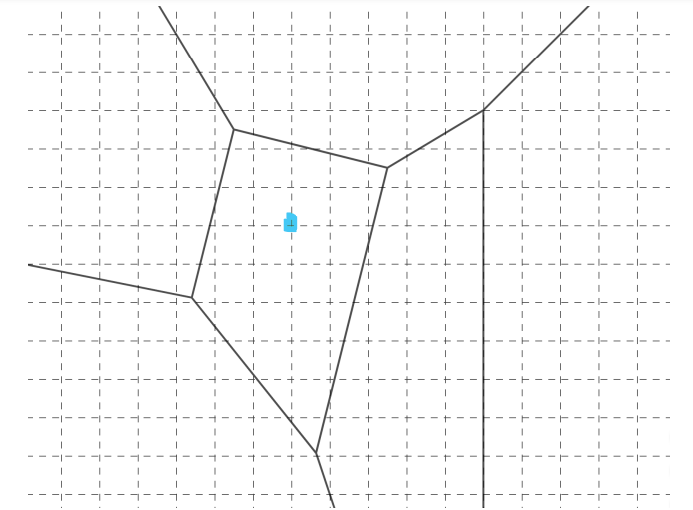
Surprisingly, since we had *just* been working on perpendicular bisectors, I was surprised that it took 7-10 minutes of working in groups before I heard the first student say perpendicular bisector. I made sure to have that word repeated and spread from group to group. I anticipated that as soon as students would think about A and C (and how there’s an infinite number of points equidistant, with that horizontal line that can be drawn)… or as soon as students would think about A and B (and how there’s an infinite number of points equidistant with that vertical line that can be drawn), it would unlock the whole problem. But my intuition led me astray. I honestly thought they’d finish this in 10 minutes, but it took around 20-25 minutes. But it was worth it. Eventually we got to this…

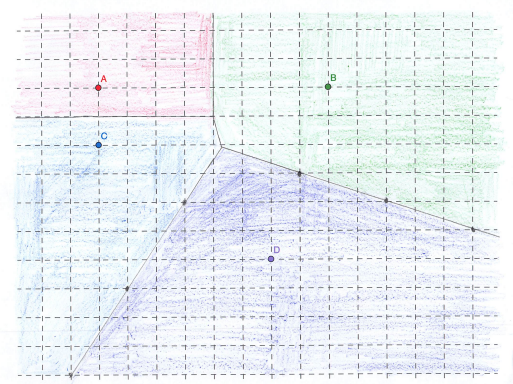
Now I will say that this region was tricky for kids…

(Note to reader: we talked more about this in the next class, and pointed out that the intersection point at the top of the yellow circled region was equidistant to A, B, and C (so it was like the intersection of the perpendicular bisectors of triangle ABC), and the intersection point at the bottom of the yellow circled region was equidistant to B, C, and D (so it was like the intersection point of the perpendicular bisectors of triangle BCD)).

After all this, I gave my kiddos a follow up “backwards” task that I invented but I didn’t have an elegant/simple way to solve. I just was curious what they would do…

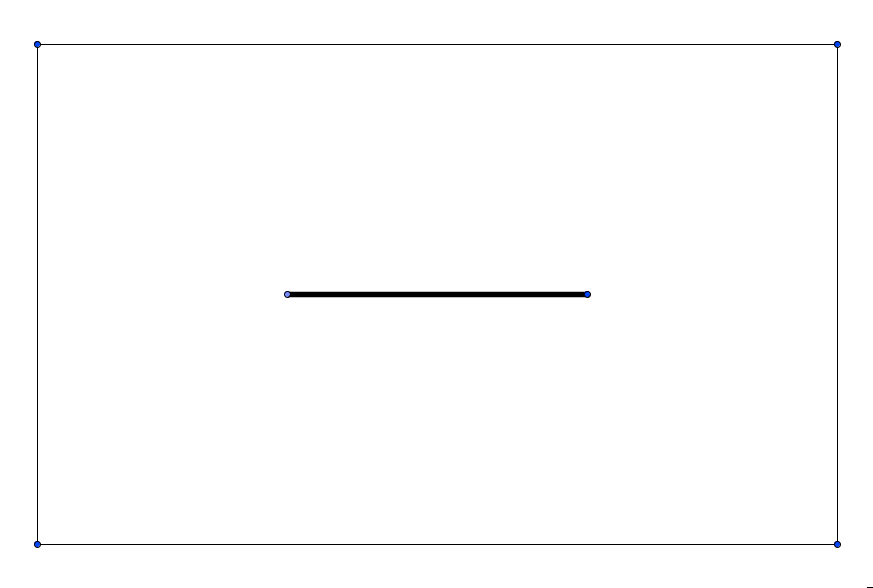
I said “here’s the diagram… can you find out where the fire hydrants are?”

They had good discussions, but we had such little time left in class, and I wanted to get to some resolution. First, I said, “play with trial and error… all the hydrants are on lattice points.”

They had good discussions. But again, we were short on time. So I said: “okay, I’m going to give you ONE hydrant location. From that ONE location, you should be able to find all the others.”

And indeed, kids were figuring the others out. We had learned about perpendicular bisectors as lines of reflections, so some kids started folding their paper along the lines to get more hydrants…

And then you can get the very last one by reflecting the purple hydrant over the vertical perpendicular bisector. To me, I like that students could see that once you had ANY hydrant, they could get all the rest of the locations. For me, that’s a nice takeaway. As I said, I was just curious to see what they might come up with.

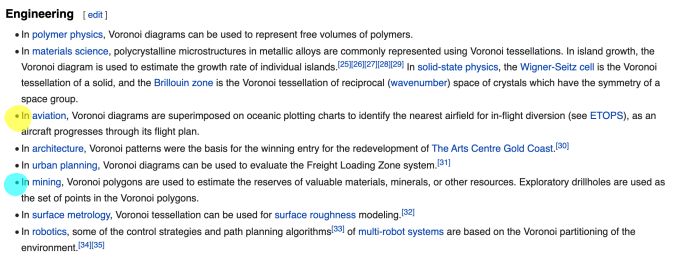
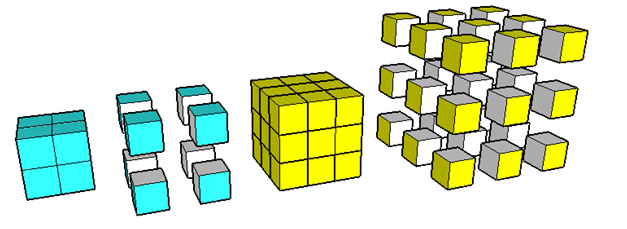
At the very end of class, literally the last 5 minutes (I wish I had more), I gave a little lecture on what these things were. They are called Voronoi diagrams. You can literally see the creation of them by this dynamic image (from Wikipedia):

And then I showed them how a giraffe’s spots are a Voronoi diagram!!! You can click the images to get a bit more

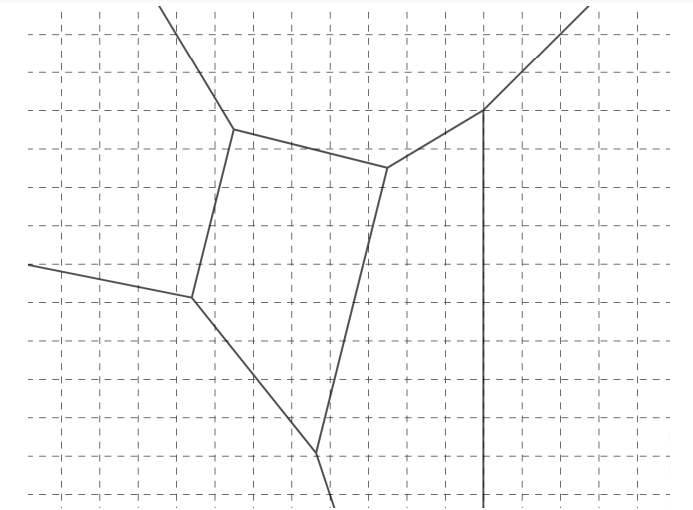
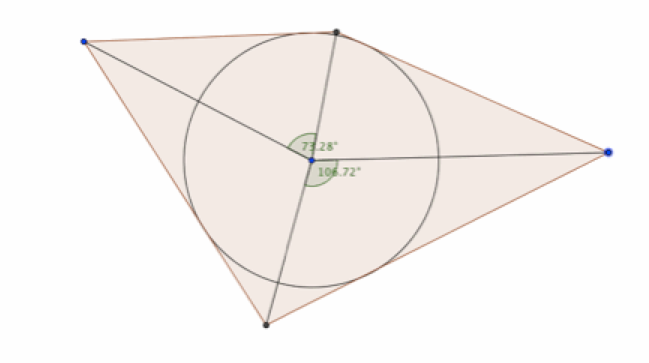
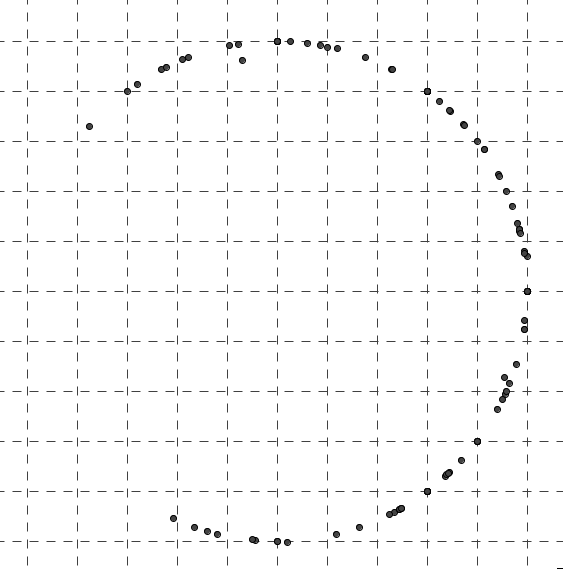
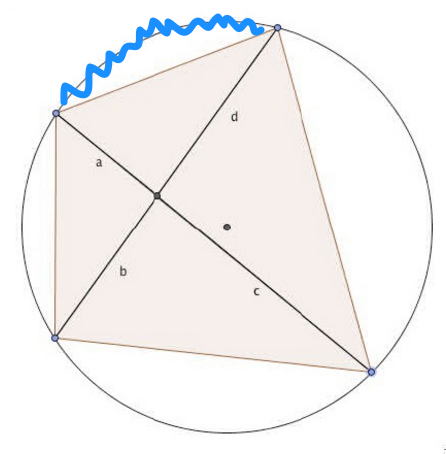
At the start of our next class, to see what students retained, I gave each student this diagram and told them to make a Voronoi diagram for it.

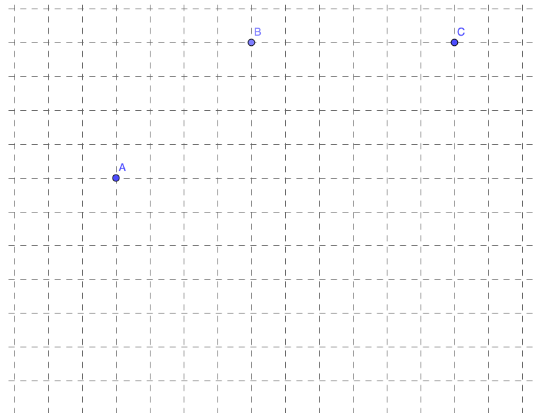
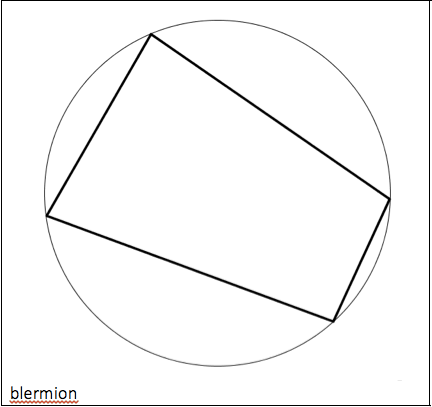
I was proud that most students could do this, fairly easily. Then when we had the solution…

… I asked what did all points on the purple ray represent, what did all points on the red ray prepresent, what did all points on the yellow ray represent, and what did the green point represent. Kids seemed great with this. And then I drew a circle (on the Smartboard, using the circle drawing tool) with a center at the green point, and made it bigger and bigger until lo and behold… it hit points A, B, and C. Huzzah!

Update: David Sabol shared this amazing Desmos activity (by Joel Bezaire) which is like what I posted above but is in many ways better. And deals with food deserts (thus social justice) naturally and seamlessly: https://teacher.desmos.com/activitybuilder/custom/5d2a410855693a4619850fd5

Update 2: And of course Bowman Dickson created a cool project out of this… link to his tweets about it here: https://twitter.com/bowmanimal/status/1589804876686675969 of course he did this recently but since I haven’t been using Twitter… I missed it.

Advertisement

A Much Belated Overview of My Advanced Geometry Curriculum

I recently got an email from someone who saw some of my many posts on geometry (you can see all my posts about geometry by clicking here). I realized I never shared them formally and everything is a bit scattered. So I’m going to try to include a few resources here. But the real joy is in all the blogposts, honestly.

I taught Advanced Geometry at my school for two years (2014-2016), and I wrote the curriculum with a good friend and dear colleague. We both hadn’t taught geometry before and decided we’d do a super deep dive and come up with a sequencing that made sense to us, and that prioritized conjecturing and noticing. In fact, we were so excited by this process that we shared our thinking both about how we built up the curriculum but also how we collaborated at a conference. Below are our slides, but you can also click here and go to the slideshow and read some of our presenter notes for each slide for more detail.

We were super intentional about everything. We carefully thought through how we wanted to motivate everything, and we didn’t want to give anything away throughout the course. In other words, we wanted kids to do all the heavy lifting and to be the mathematicians that we knew they could be.

Below is a word document with all our skills/topics (you can download the .docx file here: All Topic Lists Combined). The order might seem a little strange (we end, for example, the year with triangle congruence), but it worked for us! Everything was done on purpose (in this case, congruence is just a special case of similarity… so that came beforehand, along with trig which is all about exploiting similarity!). We eschewed two-column proofs for different forms (paragraph proofs, flowchart proofs, and anything else that showed logical reasoning).

Oh wait! For some reason our work on Area and Volume didn’t have a topic list. And I just looked and my core packet for Area and Volume derivations (where kids just figure things out on their own) has handdrawn images in it, but I didn’t scan a PDF of those. Well, at some point in the future if I remember, I’ll try to write a post to share that. (We did it after kids learned trigonometry, so they had a lot of flexibility. For example, I think kids came up with like 6 different methods to find the area of a trapezoid when they were asked to create a formula and justify it!)

I hope this is helpful for anyone trying to think through geometry. As I said before, the best thing might be to just read the blogposts, but this is a bit of an overview.

Merblions

Earlier this year in Advanced Geometry, my kids were introduced to Blermions (original post from when I created the lesson; new post after I tweaked and taught the lesson). That lesson gets kids to understand a bit about cyclic quadrilaterals and some of their properties.

blerm.png

Now we are at the end of the year, and one of my Advanced Geometry sections had three classes that the other section didn’t have. So I had to come up with something supplemental. Thank goodness for twitter. You see, @jacehan was using my blermion activity, and some of his kids asked him “what if the circle was inside the quadrilateral?”

Of course, genius that @jacehan is [his blog is here], he named these creatures merblions.

merb.png

With this one question, I had the makings of an amazing three days ready for me. You see, in Geoemtry, we had just finished studying angle bisectors (and how they related to pouring salt on polygons). We had also just finished studying triangle congruency. (I know that is usually taught earlier in the year, but when I rearranged the course, it fit best near the end of the year.) So those were two powerful tools to analyze merblions.

So I told students to pair up. And they were given the above picture and told that: “A merblion has an inscribed circle which is tangent to all four sides of the quadrilateral.”

That is all.

Then I told students that in some ways, this is a culmination of everything they’ve done all year. They have everything they’ve learned at their disposal. Geogebra. Paper. Rulers. Compasses. Protractors. But mostly, they need to make conjectures and see if they are true — either getting a lot of inductive evidence or by using deductive logic. Anything they wanted to figure out about merblions were fair game.

I also highlighted that the other geometry teacher and I started investigating these, realized they were very rich and there was a lot to discover, but we purposefully stopped investigating them. We wanted our students to make the discoveries, without us accidentally guiding them

We also told them that they needed to persevere, and be okay trying lots of things. But if they ever felt their wheels were turning and still nothing was happening, they could call us over for a nudge. (I created a list of things I could say to kids to help nudge them along if they got stuck… I didn’t have to use it more than once! Kids were into it.) They knew at the third day, they would be presenting (informally) their findings to the class. So they had to keep track of things, take screenshots, etc.

While they worked (with music!), I saw kids make conjectures, find they weren’t true, and then move on. I then realized kids weren’t recording their “failed” conjectures. But that data is important! So I told kids to keep track of all of their ideas, and even if their idea didn’t turn out to be true, it is totally worthy of putting into their presentation! It helps us see their avenues of inquiry. Similarly, I told students to record their conjecture, even if they couldn’t prove them deductively.

The kids were doing so many interesting things — including things I hadn’t thought of. (Two pairs tried finding the smallest merblion, by area, that could fit around a circle of a given size! Three pairs tried to do an “always/sometimes/never” with “A _____ is A/S/N a merblion” where the blank were all the quadrilaterals we’ve studied [kites, rhombuses, trapezoids, etc.]. One pair noted that to use Geogebra to draw a merblion, you only need a circle and two points, but the two points couldn’t be any two points — so they wondered where those two points could be located.) It was great.

They continued on the next day, and spend the last 20 minutes of the second class throwing some slides up in our google presentation [posted here, with identifying information of students removed].

What they ended up discovering was awesome.

some big results (some proved, some unproved) found

1. The center of the circle inscribed in the merblion is the intersection of the four angle bisectors. And if we cut a merblion out of cardstock and did the “salt pouring activity,” we would see the salt form a pyramid with a merblion base and a single peak (where the peak would exist at the center of the inscribed circle).

result1.png


2. Kites, squares, and rhombuses are all merblions. However rectangles are only merblions if they are squares, and parallelograms are merblions only if they are rhombuses. Some trapezoids are merblions and some aren’t.

3. No concave quadrilateral can be a merblion.

4. A merblion has two pairs of opposite angles which are acute, and two pairs of opposite angles which are obtuse (unless you have a square).

5. A merblion is secretly composed of four kites. And the four kites have two opposite right angles. (Which means that the non-right angles are supplementary in these kites.)

result2

6. In a merblion, the sum of the lengths of opposite sides are equal. result3.png

7. The area of a merblion can be computed by finding the perimeter, halving it, and multiplying it by the radius of the inscribed circle.

number4

8. For all merblions that can be drawn around a given circle, the merblion with the least area is a square.

9. In the other class (not in my class) students found this result… The two angles here are always supplementary.

result5.png

Why I loved this

The kids were totally engaged. They didn’t feel pressure to produce “the right answer” because there was no right answer. (And no grade associated with this work.) I emphasized that all conjectures (even if they don’t work out) were valid, so kids felt okay writing anything and anything down. I didn’t have a specific outcome they had to come up with, so I wasn’t leading. Kids could do anything! They got to work together.

And when some results were presented that explained things that people were wondering about — there were noticeable ooohing and aaahing (for example, result #6!).

And after the presentation happened, it became clear to everyone that by crowdsourcing this problem, we were able to see lots of results and then start examining how the different results related to each other (so for example, result #6 explains #2).

This was very fun. Very very fun.

A New Insight on the Famous Painted Block Problem

There is a famous, well-known problem in the world of “rich math tasks” that involves taking an nnn cube and painting the outside of it. Then you break apart the large cube into unit cubes (see image below cribbed from here for n=2 and n=3):

cubes

Notice that some of the unit cubes have 3 painted faces, some have 2 painted faces, some have 1 painted face, and some have 0 painted faces.

The standard question is: For an nnn cube, how many of the unit cubes have 3 painted faces, 2 painted faces, 1 painted face, and 0 painted faces.

[In case you aren’t sure what I mean, for a 3 x 3 x 3 cube, there are 8 unit cubes with 3 painted faces, 12 unit cubes with 2 painted faces, 6 unit cubes with 1 painted face, and 1 unit cube with 0 painted faces.]

Earlier this year, I worked with a middle school student on this question. It was great fun, and so many insights were had. This problem comes highly recommended!

Today we had some in house professional development, and a colleague/teacher shared the problem with us, but he presented an insight I had never seen before that was lovely and mindblowing.

Spoiler alert: I’m about to give some of the fun away. So only jump below / keep reading if you’re okay with some some spoilers.

(more…)

The key turn, and noticing with a trig table

In Geometry, we’re in the middle of our introduction to trigonometry. (If you want to hear more about that gentle, conceptual introduction, read up here.)  Up until now, kids have been using this right triangle book to figure out missing angles and side lengths. The big idea is that every triangle in the world is similar to one of the triangles in this book… so we can use that similarity to find side lengths and angles.

And finally we did the magic transition where kids saw how ratios could be used to find the labeled angle… This is the key turn, from sides of triangles to ratios of sides.

triangle

Initially all students used the pythagorean theorem to find the hypotenuse and then they “scaled the triangle down” to find the similar triangle in the book with hypotenuse one. From there, they could find the angle.

But then I asked: How could you find the angle without using the Pythagorean theorem? They could still use the triangle book, and the basic functions on their calculators (kids obviously at this point don’t know about sine/cosine/tangent). Some were stuck, some saw it right away. But eventually everyone recognized that they were looking in the triangle book for a triangle which was similar to the triangle given. And we know that proportions of corresponding sides in similar triangles stay constant… so they used guess and check to find triangles in the book with a vertical/horizontal ratio that matched 2.2204/0.8082.

Okay, great. They hated thatThey had to divide the side lengths on a bunch of different triangles in the triangle book. So annoying. It was much worse than just using Pythagorean theorem and scaling down. 

So here’s where we paused. I said: “okay, fine, agreed. This is annoying and horrible, and the Pythag approach is much nicer. Let me ask you this… What if I put the ratio of the vertical/horizontal leg on every page in the book. So you had the ratio. Which way would be more efficient to use then?”

Everyone said the ratio. Why? Given a triangle, you simply take the ratio of two sides, and then flip in the book until you see the same ratio. Then you can immediately read off the missing angle. One division, that’s all. (With Pythag, you have to first calculate the hypotenuse without any error, and then scale that triangle so the hypotenuse is one, and only then flip in the book! And that might lead to more error.)

So I showed them trig tables. Of course they don’t have sine/cosine/tangent yet on them. And I let them use it on a few problems.

And then… FUN! I asked kids to just look at the table and just “notice” patterns.

They came up with some great things, which I then started playing with on the fly. I told them to call the three columns “Ratio 1,” “Ratio 2,” and “Ratio 3”:

  • As the angle increases, Ratio 1 starts close to 0 and goes close to 1.
  • As the angle increases, Ratio 2 starts close to 1 and goes close to 0.
  • Whoa, wait, the numbers in Ratio 1 and Ratio 2 are “reversed”! Reading Ratio 1 from the top-down, and Ratio 2 from the bottom-up is exactly the same.
  • As the angle increases, Ratio 3 starts close to 0 and gets higher… dramatically higher at higher angles!
  • The numbers in the Ratios didn’t seem to be going up “proportionally”


While they were looking for patterns, I noticed no one had taken out their calculators, so I told ’em to see if their calculators could help them figure out any additional patterns.

  • Ratio 1 divided by Ratio 2 is the same as Ratio 3.

They will be exploring some of these ideas later,  and class was coming near to a close, so we didn’t explore everything we could have. But we did talk about a few things.

(1) We briefly discussed why Ratio 1 will never equal 1. (The hypotenuse of a triangle can’t ever equal a leg of a triangle! You wouldn’t have a triangle, but a segment.)

(2) We saw in a triangle why Ratio 1 divided by Ratio 2 yields Ratio 3.

And finally, I most wanted to capitalize on the observation that I hadn’t anticipated… but discussing it would combat a great question kids don’t really grok well in higher grades… What is the shape of the sine curve? Usually they think it is linear from 0 degrees to 90 degrees. That there is a linear relationship between angles and the ratios. So here’s what I did:

I told students that I would be plotting on the x-axis angle number, and the y-axis Ratio 1. If this was a line, then if you pick any two points on this line and calculate the slope, the slope should be constant. [1]

Each kid chose two different angles, and looked at the associated Ratio 1 numbers, and calculated the slope. While they did that, I was doing a little magic in Geogebra to show the data graphed.

Kids were getting different slopes. So they knew it wasn’t a line. But many slopes very close to each other! Curious.

geogebragraph.png

A kid saw the graph and said “Hey, it looks linear at the beginning” and that explained why so many slopes were similar but not the same. Kids were mainly ch0sing angles from the first page of the ratio table! Ha! Love it! Last year teaching geometry, I didn’t ever show them a sine curve. But this came up so naturally that I had to!

This was a bit on the fly and haphazard, but this discussion of whether the ratios were linear or not was one of my favorite things I’ve done recently! I should find a way to formalize it and build it into the curriculum in more solid way.

UPDATE: OMG I am an idiot. I forgot to mention something crucial. I want kids to recognize that if they have a trig table with only Ratio 1 (aka Sine), they can generate the entire trig table. We have an abundance of information! And this discussion of their noticings seems perfect for that. This is the follow up I used last year, and I will again use it this year.

The key point I’m getting to: the truth is we don’t need sine, cosine, and tangent. We only need one of them. For example, if I know sine, then cosine can be defined as \sin(90-\theta) and tangent can be defined as \frac{\sin(\theta}{\sin(90-\theta}. So why do we have all three? Life is easier. Look at triangle (g) above in this post. Try using a table with only Ratio 1 to find the missing angle. It is more work than if we had a table for Ratio 3. 


[1] Okay, yeah, so afterwards, I realized I could have just asked if the ratios had a constant difference. But my more complicated approach led to something interesting! Also: if I had more time, I would have asked kids to develop a way to decide if the ratios were growing linearly or not. I bet some would have said common difference, some would have said find the slope, and some would have said graph!


Teaching the Crossed Chord Theorem

At the end of the past summer (oh how long ago that was! glorious days of freedom!), I hunkered down at a coffeeshop with @jacehan in preparation for this school year. I was fixing up some of the things we did last year in geometry. One thing I wasn’t pleased with was how we taught the crossed chord theorem…

chord.png

So I created a totally new approach. Instead of having students discover the theorem, I would work backwards. Here is the TL;DR from my last post — after I had created the activity.

The TL;DR version: students investigate all quadrilaterals where the diagonals satisfy the property that ac=bd. Students are guided to make a conjecture which we as teachers know will be wrong. Then we show a counter-example to blow their conjecture up. And them bam: they have to try again. Using geogebra and some more encouragement, students discover that all cyclic quadrilaterals satisfy ac=bd. And so the circle emerges out of this investigation of quadrilaterals and diagonals. This is, then, the crossed chord theorem. Which students got at by investigating quadrilaterals. Weird. Now they are in a prime place for wondering why the circle shows up. Proof time!

When I shared the activity, I got a couple suggestions from @k8nowak and @bowenkerins and so I modified it with a single tweak which made it oh so much more powerful. In this post, I will talk about my experience implementing the activity, as well as share the modification I made. However I entreat you to read the original post as I’m not going to outline everything again! So go read! Okay? Okay.

(1) First off, the change. I made a change to the very last question on the sheet… Instead of having students look for blermions “in the wild,” I had them fix three points and find a bunch of different locations for the fourth point (so the quadrilateral would be a blermion).

[docx: 01 Crossed Diagonals [new]]

At the end of class, I had students fill out a google form with their possible fourth points location.

(2) In class, when students were filling out the conjecture in #4, I saw a number of interesting conversations happening. Their conjectures were essentially: (a) all blermions need at least one pair of parallel sides, (b) all blermions have supplementary adjacent angles, and (c) a blermion has opposite angles supplementary. Most students didn’t find any kites that were blermions, which is why they came up with conjectures (a) and (b). But when the few students who found blermion kites said this to the class, we realized that (a) and (b) couldn’t hold anymore. But conjecture (c) was a possibility still.

Now to be clear, I was expecting conjectures (a) and (b). I was floored when not one but two groups out of five wanted to persevere and find a good conjecture, and used geogebra to measure angles. It was awesome. And it led to a great discussion later on. More on that later.

(3) I asked kids why I had put question #5 on the sheet… what might have been my motivation? I liked asking that question and having groups discuss, because they all recognized that by only looking at “nice” shapes (which, granted, I asked them to do), they could only make limited conjectures. And as soon as they see the blermion in #5, most conjectures would go out the window. The point? To show students that all quadrilaterals aren’t “nice.”

(4) The moment when students saw all their group’s data together in #6… Well, two of my groups got to this point in class. It was … incredible. Kids had their minds blown. Something totally unexpected happened.

For the other groups, I shared the class data (from the data they entered in the spreadsheet):

GGB.png

Holy cow! It is so beautiful! All possible fourth points of a blermion seem to lie on a circle!

(5) Students then wrote a conjecture, and we said if the conjecture were true, we’d suspect (from the Always Sometimes Never questions in #3) that all squares, rectangles, and isosceles trapezoids could be inscribed in a circle. And we discussed how we were going to prove the opposite: If you have a cyclic quadrilateral (yes, I introduced that term!), that product theorem thingie (a)(c)=(b)(d) holds with the diagonals. Okay, we were a bit more formal, but that was the crux of things.

(6) Before proving that, I wanted to exploit the conjecture (c). I had students prove that all cyclic quadrilaterals had opposite angles that were supplementary. They struggled a bit with this, but once they had their insight, BOOM. (They used the inscribed-central angle theorem thingie — a central angle is half its corresponding inscribed angle).

(7) Then I left students to prove the crossed chord theorem. I gave them this sheet:

[docx: 01 Crossed Diagonals (proof)]

Almost all kids got to the point where they recognized two pairs of similar triangles. And they recognized that if they could prove one pair of similar triangles were congruent, they could set up a proportion and be done! But the problem was proving the triangles similar. Almost all groups got stuck here — and even though I said: you’re almost there! Think about the inscribed-central angle theorem! — they couldn’t progress. I didn’t do a great job of knowing what to say next.

What I did was show them this (which they had created earlier). For some reason, this did not work for them as a hint.

Inscribed Angle Conjecture.png

In the future, what I should do is just highlight an arc for them… and say “this arc can guide you!”

arc.png

Maybe that will work better?

However, eventually all groups got the proof.

(8) At this point, I had students start solving problems. Two with quadrilaterals and two with chords.

questions.png


Again, I asked them why I included had the second two types of questions, and had the discuss in groups. They recognized that the theorem didn’t need to be stated with cyclic quadrilaterals… Instead it held if we are talking about two line segments in a circle (at that point, I introduced and defined the terminology “chord”). Then I had students write the theorem we had proven without reference to the quadrilateral, and we went around and shared and critiqued the wording.

***

I don’t always love the stuff I come up with. Sometimes it flops. Sometimes it’s pretty good. But rarely do I think it’s so awesome that I would give it the stamp of “highly recommended.” This gets that from me. It is interactive, there is a moment when kids’s minds are blown, and it ties together so many interesting ideas.


For context, I did this after we did our unit on similarity. We then proved that the base angles of isosceles triangles were congruent. We then used that to prove the inscribed-central angle conjecture (download here: A Conjecture about Inscribed Angles). And then this. It flows so nicely.

***

Yesterday, as we were wrapping this all up, I said to my kids:

“This thing we just proved about circles and chords… this is at the top of a mountain… this theorem is based on lots and lots of other things. If I gave you a bunch of circles with two intersecting chords in it at the beginning of the year, and said, give me some conjectures about this, I doubt you would ever have stumbled upon this… or if you did, it would have taken you a long time and it would have been an accidental discovery. You still wouldn’t have known why it was true. But now you have built so much mathematics throughout the year that this wasn’t an insurmountable feat. What ideas did this theorem lie on?”

mountain.png

And we even had more. We had to know a lot to get there. But wow, it might have seemed impossible at the start of the year, but it was totally doable with all the tools we’ve put in our toolbelts. And how wonderful and inspirational is that?!

Update: Here is a post about an extension I did on this — involving merblions.

Fold and Cut

Brendan — my geometry coconspirator — and I went to the Museum of Math recently to see Erik Demaine give a talk about math and magic. It was a special lecture for me because I saw Prof. Demaine speak at the very first Museum of Math lecture (before the museum was built), and this was the five year anniversary of that talk.

Prof. Demaine and his father Martin Demaine both are mathematical artists — playfully using mathematics and art in search of higher truths. The most mindblowing thing that he discovered was that by folding paper however you want, and making only one single cut, you can cut out any polygon. Evenmoreso, the theorem goes further: “Thus it is possible to make single polygons (possibly nonconvex), multiple disjoint polygons, nested polygons, adjoining polygons, and even floating line segments and points.” [1]

Whoa, right? So say you want to cut out each letter of the alphabet? Done.

Or you want to cut out a swan or jack-o-latern?

You can do it. It boggles my mind.

When we went to Prof. Demaine’s talk, on each chair was a packet of paper and a pair of scissors. We were challenged to “fold and cut” each of the shapes out. The shapes were scaffolded well, and so I got pretty far along and was figuring things out. At that time, Brendan and I realized that both angle bisectors and perpendicular lines were key for much of what we were doing. We also realized that the puzzle nature of the challenge got us obsessed. We both were stuck on a single page [I’ll write about that in the P.S.] and as I was waiting for the subway home, as I rode the subway home, and all throughout the next morning, I grappled with it. I still have no clue how to solve it.

In any case, we both wanted to expose our geometry students to this puzzle. We figure next year we could turn it into a lesson — having them play and then have them analyze what they figured out. But for this year, we wanted to just see what happened if we gave our kids the puzzles.

I faintly recalled my friend Bowman doing this in his class and blogging about it, so I found that post and used his recommendations about what to have the kids cut out in which order, with the scaffolding that Prof. Demaine used in his packet, with some ideas that Brendan had, to create our own packet of fold and cut puzzles.

Fold and Cut Figures [PDF download]

What happened? Well, we gave kids 25-30 minutes. We had extra copies of pages for if kids messed up and wanted to try again. And we said “go at it.” Of all the kids in my class, only one seemed not to get into it… at the beginning. That student was trying too hard to have a “method” and their intuition wasn’t as strong as the others… but they showed me proudly at the end when their star! All the other students were addicted. Paper flew about. Kids called me over to proudly show me their successes, and wailed in frustration when their cut didn’t work (and then hurriedly asked me for another copy of the page they messed up on ). It was exciting to see kids focused but also having fun playing with math. I would say that 25-30 minutes was the right amount of time, because at that point, I saw kids start to fade. (It could also be that we met at the very end of the day, and this was the last 30 minutes of a 90 minute block…) No kid in the time given was able to get the scalene triangle (many got close) or the last quadrilateral. But almost every kid was able to get all the figures before ’em.

Next steps from here? I want to turn this into something more formal. I like the play. I love the play. But then we need to come up with some general conclusions and talk about why they work. Why are we doing lots of folding along angle bisectors? [Hint: the answer has to do with reflections!] Why are we doing lots of folds perpendicular to the lines of the polygons we’re trying to cut out? [Hint: if we imagine a “vertex” at the place where we have a perpendicular fold, we can consider our fold an angle bisector — bisecting the 180 degree angle of the vertex!] If kids understand those two principles (and the scalene triangle is the most perfect shape to make them both come alive!), I will have a way for kids to tie their puzzling to our geometry curriculum.

What most impressed me was how much intuition kids already had with regards to these. It was amazing to see them take to it as adroitly as they did.

And who knows? Even though I say we should tie this to the curriculum formally next year, maybe I’ll get to it this year after we complete our mountains of salt investigation. Because heck if they aren’t perfectly related to each other!

P.S. So… Here’s where we got stuck. We were given the following paper… no polygon, just a line segment that we had to cut.

impossible

You might say: duh, fold it vertically in half and make a half cut. But here’s the thing: you have to make a COMPLETE cut. So once you start cutting, you have to keep cutting until you have completely hit the end of your paper. And BOOM! Suddenly I am perplexed.