Algebra II

Part II of Machines: Helping Us Understand Inverses

Here is Part I. Read that first! Also, I’m trying to write and post this quickly, so sorry if it is incoherent, monotonous, etc.

Okay, so now kids understand machines have inputs and outputs, and they understand that the “rule” can take different forms: words, equations, tables, and graphs. Wonderful.

Machines to think about Functions vs. Non-Functions

So recall that our definition of machines was:

image7

So I had kids try to see what might go wrong with these machines…

image1.png

From our conversations over these problems, students were able to see which machines were “problematic.” At this point, I told them machines that worked were called “functions” and machines that didn’t work were called “non-functions.” Conversations we had:

  • We talked through what made something a function (every allowable input had a single output) and which made something a non-function (there was one allowable input that has multiple outputs).
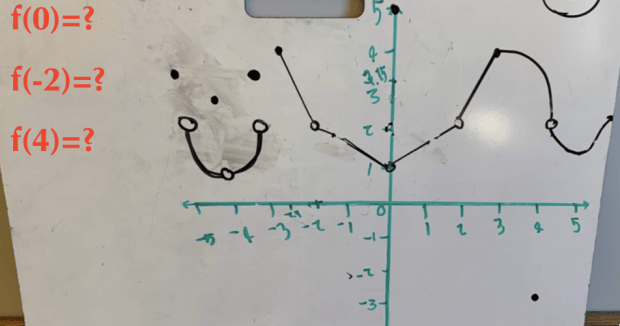
  • I had kids look at the graphs and come up with a quick way to “see” if a graph was a function or not… so from this, they came up with the vertical line test on their own.

We did a lot of practice with this idea. Kids were asked to look at a bunch of representations and decide if they were functions or not. And if they weren’t functions, they had to provide a concrete example showing where they failed (e.g. for (g) below, an input of 2 gives two ouptut of 2 and 4.)

image2.png

By the end of this, I was very confident kids understood the idea of functions and non-functions.

Combining Basic Machines

Okay. Here’s where we start to get more abstract. I start telling kids that for now, we’re going to focus on four basic machines (machines with add, subtract, multiply, and divide)… but because I’m lazy and can’t make cartoon machines all the time, I’m going to come up with a simplified notation for them…image3.png

You, dear reader, might wonder why I’m using “blah” in these machines. That’s because it is helpful when we start combining machines:

image4.png

Yes! It’s like a conveyor belt. Each machine takes in an input and spits out an output… that then becomes the input of the new machine… So they could start figuring out questions like these, which made me happy!

image5.png

Now #17 was really tough for kids. But I let them struggle before guiding them. From this one problem, students could start seeing how equations and machines were related. By the end of our conversation, kids knew the line was y=2x+4. So if they have an input of x, they multiply that input by 2, and then they add four to the result. Which means the machine would be:

____[blah*2]____[blah+4]_____

And so students started plugging in various values for the initial input (x value) and saw they got the final output (y value). Then we substituted x into the machine… and got 2x for the middle blank, and then 2x+4 for the final blank! Seeing that really helped kids drive home the connection.

Some kids got the second way to write these machines by trial and error. But I was hoping they’d rewrite y=2(x+2). And then think if they have an input of x, they first add two to it, and then they multiply that result by 2. Which means the machine would be:

____[blah+2]____[blah*2]_____

Creating Machines from Equations and Vice Versa

We then became comfortable going from a machine representation to an equation representation, and vice versa.

If I gave students: y=2x^3-4, they would say: we cube the input, multiply it by two, subtract 4. So the machine would be _____[blah^3]____[blah*2]____[blah-4]_____.

Or if I gave them: y=-\sqrt{-x+3}, they would say: we take the input and multiply it by -1, we add three, we take the square root of that, and then we multiply by -1 again. So the machine would be _____[blah*-1]____[blah+3]____[sqrt(blah)]____[blah*-1]_____.

And also in reverse, students could be given a machine, and easily come up with the equation by substituting in x for the input, and come up with the output. So:

___[blah-3]___[blah^2]___[blah-4]___

would look like: x, x-3, (x-3)^2, (x-3)^2-4. So the equation represented by this machine is y=(x-3)^2-4.

Basically, students are seeing how the basic equations are built up and broken down. What’s nice about this is order of operations starts to really get emphasized and naturalized.

Creeping Up To Inverses

At this point, kids are comfortable with combined machines. And so I throw them a backwards question, something they’re used to (since they’re my favorite type of question to give kids). First I start off concrete…

image6.png

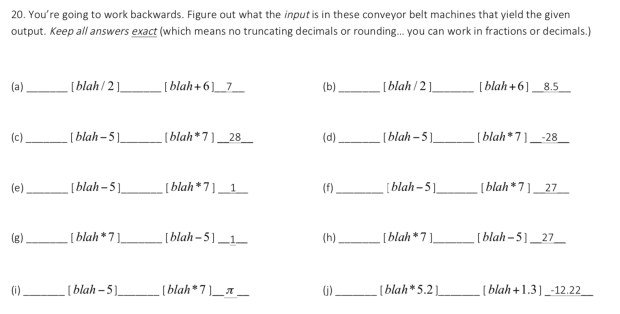
… where they were doing a lot of thinking about inverse operations. But then I had an activity where students were trying to create machines that would “undo” another machine. By the end of this activity, students were starting to create their own inverses. They could do problems like this:

I give you this machine which I will call machine M: ___[blah-5]___[blah*7]____,
You need to tell me what machines I could append to the end of machine M would make any input be the same as the final output.

So kids eventually saw the appended machine would be: ____[blah*1/7]___[blah+5]_____

So the big machine would be: ___[blah-5]___[blah*7]____[blah*1/7]___[blah+5]_____

And any input would also be the output (e.g. if we put in 1, we’d get 1 –> -4 –> -28 –> -4 –> 1.)

We called the machine created the inverse machine… and we named it machine M^{-1}.

So the inverse machine of ___[blah-5]___[blah*7]____ was ____[blah*1/7]___[blah+5]_____. Kids saw we “read” the original machine backwards, and did the inverse operations.

From this, we started going into inverses of lines:

image7.pngEventually, we got to the point where kids would be given y=x^3+4. To find the inverse, they would create the machine for this: ___[blah^3]___[blah+4]___. And then they’d create the inverse machine: ____[blah-4]____[cuberoot(blah)]___. And then they’d find the equation that this machine represents by substituting in x: y=\sqrt[3]{x-4}.

So questions like these didn’t really faze them:

image13.png

Inverses with more representations…

From here, I started having kids come up with inverses of tables. I reminded them that if we combine a machine with its inverse, whatever we input into the big machine should be the same output… So let’s see what happens…image8.png

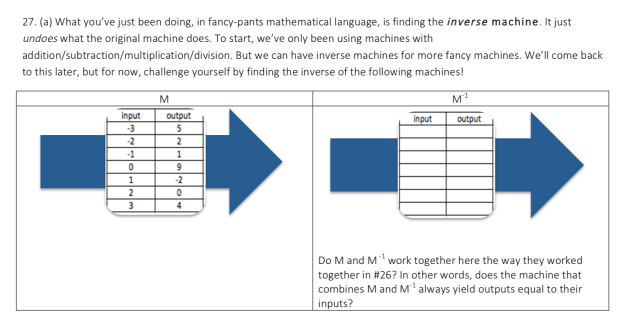
And this was lovely… We’re combining two tables… and our goal is to create a large machine that when an input goes through both of machines, the output would be the same!

So look at the two tables above as rules. And we’re going to combine both tables to make a big machine. So kids saw from this that if we put an input of -3 into M, we’d get 5 as an output… and when we feed 5 into M^{-1}, and we must have -3 as an output (since the output after going through both machines have to be the same as the initial input). So the inverse table is going to look like the original table, but with inputs and outputs reversed.

Why is this so beautiful? Because from this, kids saw that for inverses, the domain and range swap. And they also saw that to create an inverse, you simply have to switch the x-values and the y-values with each other. You get all of this for free!

And then I gave them graphs, and told them (with no instructions) to come up with the inverses… But since they had done tables, and see how the tables just swapped the inputs and outputs to get the inverse, they had no trouble drawing the inverse graphs.

image14.png

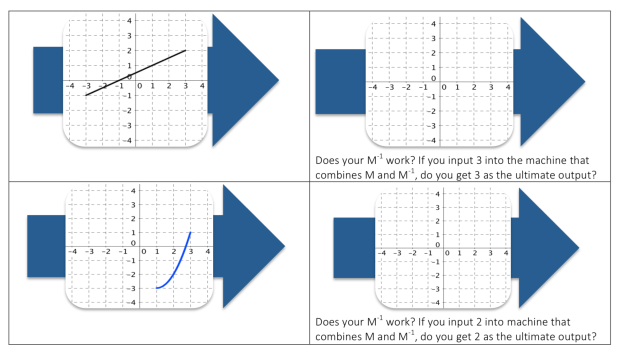
And it’s lovely. Because they figure this out all naturally. I didn’t have to tell them anything but kids were accurately drawing inverse graphs. Putting the graphs right after them doing inverse tables was genius! And some kids came up with the fact that inverse graphs were reflections over the line y=x themselves!

Of course, sometimes inverses exist but aren’t functions… So I threw everyone some curveballs…

image9

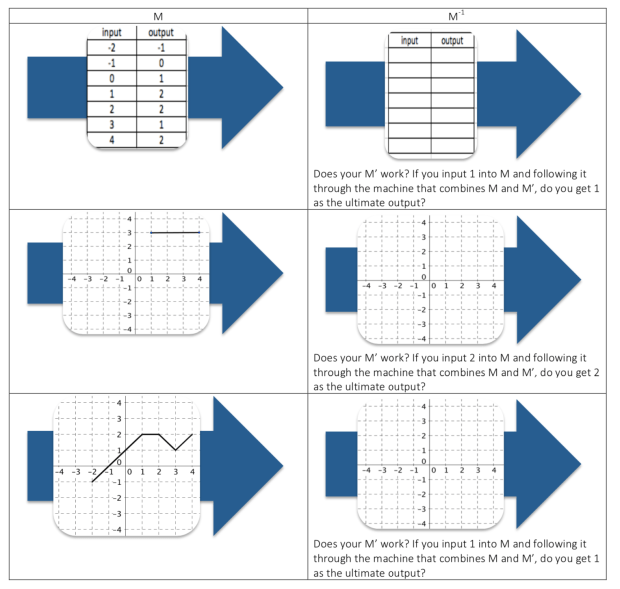
And they saw how they could create the inverse… they could fill in the table or graph… But they saw why the inverse was “problematic” (a.k.a. not a function).

So now kids were thinking: okay, what’s the inverse? Is the inverse a function or not?

I drove this home with lots of questioning…  We had previously looked at these questions and decided if these each were functions or not. But now kids were able to decide if their inverses were functions or not.

image2

They immediately were looking to see if any outputs had multiple inputs associated with it. And they came up with the horizontal line test on their own. It was glorious.

Going The Very Last Step with Inverses

From all of this, kids learned so much. They saw how to graph inverses. They saw the inverse graph is a reflection over the line y=x. And then we drove home the idea that the inverse graph is the same as the original graph, but with every x-coordinate swapped with every y-coordinate. To polish everything off, we saw the equation for the inverse graph can easily be found by swapping the x variable with the y variable.

image10.png

So the inverse of y=x^2 was x=y^2.

So finally, my kids could answer questions like:

image11.png

Sorry this was so long and scattered. But stay tuned. My favorite thing is coming up… whenever I get a chance to write the next post!

Advertisement

Part I of Machines: A Useful Algebra 2 Representation

So last year, I started teaching Algebra 2 again after years of not teaching it. I worked with a colleague on the curriculum, and one thing we really wanted to make sure kids were continually exposed to were various representations of functions and relations. Of course this includes equations, graphs, tables, and words. 

But in addition to these representations, I was inspired to include a fifth representation. It has a few drawbacks, but I can’t even express to you how many positive aspects it has going for it. It is the “machine.” I remember seeing images of these machines in middle school textbooks, and they really emphasize the idea of an input, output, and rule. Here’s one I randomly found online:

image2.png

In this blogpost, I’m going to share how I introduced this representation, and how I subsumed the others in it. In future blogposts, I’ll share all the ways I’ve exploited this representation. It’s pretty magical, I have to say. So stay with me…

At the very start of the course, I introduced this machine representation also. Just not as fancy and cartooney.

image7.png

I thought a lot about whether I wanted the machine to allow multiple inputs or allow multiple outputs. In my first iteration of drafting these materials, I did that, but then I backtracked. Things started to get pretty complex with an expanded definition for a machine, and I wanted to start the course simply. And, of course, I really wanted to emphasize the idea of a function and a non-function. So I started with the definition above. And started with things like this…

image3.png

Notice these are “non-mathy” examples of machines. They eased kids into the idea, without throwing them into the deep end.

What was nice is that we got to understand and interrogate the idea of domain and range from this… where I described the domain as the “the bucket of all possible items that can be put into the machine and give you an output” and the range as “the bucket of all possible items that comes out of the machine.”

image4.pngSo for the sandwich one, we know the range is {yes, no}. And the domain might be {all foods} or {every physical thing in the universe}. We talked about the ambiguity and how for these non-math ones, there might be multiple sets of domains that make sense. But then for the math-y ones, we saw there was only one possible domain and range.

In fact, to really drive home the idea of inputs, outputs, domain, and range, I created an activity. I paired up the kids and one kid was the machine, and one kid was the guesser.

The machine got a card like this, with the rule:

image8

The guesser got a card with the domain and range:

image9.png

And the guesser would give words to the machine, and get a result. And their goal: figure out the rule. Then I would switch the machine and guesser, and give a new set of cards. It was crazy fun! I did it a long time ago, but I distinctly remember kids wanting to play longer than the time I had allotted. (If you want the cards I made, here’s a PDF I created Domain and Range Game.)

Next I showed how the “rule” in the machine could take a number of different forms — tables, words, equations, and graphs — and this is how I introduced the various representations. Kids were given these and asked to fill in the missing information…

image5.png

… and then they were asked to find the domain and range for these same rules…

image6.png

To drive home the various representations, I gave kids questions like these, where kids were given one representation and were asked to come up with the equivalent other representations.

image1.png

So this was the gentle introduction my kids had to machines. I’ll explain where we went from there in future posts… and I promise you it’s going to be good… I’m really proud of it!

A short whiteboard activity to check understanding

So I’m not great at coming up with activities. Not in the way people talk about. But I recently was in a moment in my Algebra 2 classes where we had discussed function notation and how we use it, and also we had introduced interval notation to discuss things like domain and range. I wanted to challenge students to test their understanding. So I came up with this activity!

Kids have to come in knowing: 

(a) what a function is, what interval notation is
(b) what domain and range are conceptually, and how to write them in interval notation
(b) how to read/understand function notation

Here’s what I did.

Kids in each group got a giant whiteboard. In one color, they were asked to draw x- and y-axes and put tick marks so each axis went from -5 to 5.

Then they were asked to draw a function. The requirements: it had to be complicated and interesting. I made it into a small competition, with my subjective interpretation deciding which group won. They also had to be able to determine pretty clearly what the domain and range for their function were. They were told that their graphs would be given to other groups to stump them. So make ’em good!

Kids rose to the challenge. Here are three examples:

This slideshow requires JavaScript.

Cool, right? I had each group write what the domain and range was for their functions on a post-it note on the back of the whiteboard.

Then I assigned each group a different group’s graph. Everyone in class took a crisp photograph of the graph they were assigned. And then class was over.

That night, kids did problems #1-#4 in this sheet I created. I’m pretty proud of this sheet! (Here it is in .docx form to download/edit.)

The next day, kids in groups compared their answers to #1-#4 with each other. They made revisions. They checked to see if their domain/range matched the post it on the back (the post-it the original group made when they created the graph). Then they worked collaboratively on #5 and #6.

When they were all done, I went around and checked their answers. (I had filled out an answer sheet for all the graphs so this part could be smooth.) I had discussions with groups about misconceptions they had. These conversations helped me see precisely where kids were getting tied up.

That’s where we are right now. A great finishing activity to function notation, domain, and range. I was so so so happy with the strong work kids were doing with such tricky functions! It was incredible! I even found a few mistakes in my own answer key!

At the start of our next class, I’m going to project a few questions like these to draw together our understandings and talk through some larger things that I realized I needed to highlight from my smaller conversations with groups:

pic4pic5

Overall, this was relatively simple to execute. It broke up the monotony of class. And I love what I got out of it in terms of student thinking/analyzing.


Some notes from doing this:

  • I loved kids working on the whiteboards to create their functions, with the easy ability to erase and recreate parts of their graphs. And I’m glad the whiteboards are large. I only wish that the whiteboards had gridlines on them to make the graphs extra neat and easier to read.
  • I wondered if, after a group themselves finishes drawing their graphs, they should be given the worksheet to fill out on their own work. (In addition to a new group.) Then the worksheets could be compared and discussions/debates could happen.
  • That being said, I liked that the worksheets/questions were hidden from kids, so they felt like extensions beyond the domain/range.
  • I thought a lot about how Desmos activity builder could probably be harnessed to make this happen… where kids create their own graphs to challenge classmates with… But even if kids don’t come up with their own graphs, a Desmos activity with well-created graphs could also be neat to have at my fingertips.
  • It took kids about 20 minutes to draw the axes and come up with their graphs. And some took a little longer if they had a tough time identifying the domain/range for their post-it.

Tiny Game Re: Euler’s Number

I’m teaching Algebra 2 this year and the other teacher and I decided that we should introduce e to our kids. The reason it’s challenging is that it’s hard to motivate in any real way. You can do compound interest, but that doesn’t do much for you in terms of highlighting how important the number is. [1] I asked on Twitter for some help, and I got a ton of amazing responses (read them all here). My mind was blown. This year, though, I didn’t have time to execute my plan that I outlined at the bottom of that post. So here’s what I did:

  1. The core part of what I did to get the number to pop up was to use @lukeselfwalker’s Desmos activity. I like it for so many reasons, but I’ll list a few here. It starts by “building up” a more and more complicated polynomial of the form (1+\frac{x}{n})^n, but in a super concrete way so kids can see the polynomial for different n-values. It shows why the x-intercept travels more and more left as you increase n, so when you finally (in the class discussion) talk about what happens when n goes to infinity, you can have kids understand this is how to “build” a horizontal asymptote. It gets kid saying trying to articulate sentences like “this number is increasing, but slower and slower” (when talking about the value of the polynomial when x=1. And they see how this polynomial gets to look more and more like an exponential function as you increase the value of n. If you want to introduce e, this is one fantastic way to do it.
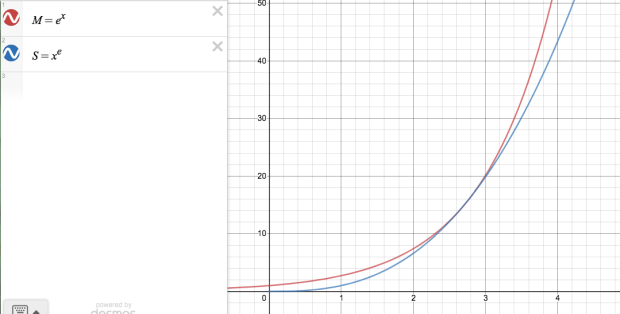
  2. A few days later, I had everyone put their stuff down and take only a calculator with them. They paired up. (If someone didn’t have a pair, it would be fine… they just sit out the first round.) On the count of three, both people say a number between 0 and 5. (I reinforce the number doesn’t have to be an integer, so it can be 4.5 or something.)Then using their calculators, they calculate their score: they take their number and raise it to their competitor’s number. The winner has the higher number. (If it’s a tie, they go again until there is a winner.)

    Then the loser is done. They “tag” along with the winner and cheer them on as they find another winner to play. This goes on. By the end, you have the class divided into two groups each cheering on one person. (I learned this game this year as an ice breaker for a large group… it’s awesome. This is the best youtube video I could find showing it.)

    Finally there is a class winner.

    So I then went up against them.

    And when we both said our numbers, I said: e.

    The class groans, realizing it was all a trick and I was going to win. We did the calculations. I obviously won.

    We sit down and I show them on my laptop how this works:

    graph.png

    The red graph is my score, for any student number chosen (e^x).
    The blue graph is the student score, for any student number chosen (x^e).

    Clearly I will always win, except for if my opponent picks e.

    I tell kids they can win money off of their parents by playing this game for quarters, losing a few times, and then doing a triple or nothing contest where they then play 2.718. WINNER WINNER CHICKEN DINNER!

  3. After this, I show kids these additionally cool things (from the blogpost), saying I just learned them and don’t know why they work (yet), but that’s what makes them so intriguing to me! And more importantly, they all seem to have nothing to do with one another, but e pops up in all of them!pic1pic2pic3

    I re-emphasize e is a number like \pi and I showed them this to explain that it pops up in all these places in math that seem to have nothing to do with that polynomial we saw. And that even though we don’t have time to explore e in depth, that I wanted them to get a glimpse of why it was important enough to have a mathematical constant for it, and why their calculators have built in e and ln. 

That is all. I honestly really just wrote this just because I was excited by the “game” I made out of one of the properties of and wanted to archive it so I would remember it. (And in case someone out there in the blogoversesphere might want to try it.)

UPDATE: Coconspirator in math teaching at my school, Tom James (blogs here) created the checkerboard experiment using some code. You can access the code/alter the code here. The darker the square, the more times the number for the square has been called by the random number generator. And with some updates, you can make more squares! In the future, we can give this to kids and have them figure out an approximation for e.


[1] And introducing it with compound interest means you have to assume 100% interest compounded continuously. Where are you going to get 100% interest?!?!

Clothesline Math – Logarithm Style

I remember when I first heard about Clothesline Math, I was excited by all the possibilities. And in a few conference sessions with Chris Shore, I saw there was so much more than I had even imagined that one could do with it!

It’s basically a number line, that’s all. But it’s a nice public giant number line which can get kids talking. Today I came back from spring break and before break, students learned about logarithms. However I wanted to have them recall what precisely logarithms were… so I created a quick Clothesline Math activity.

I hung a string in the classroom. I highlighted it in yellow because you can’t really see it in the photo…

string.png

I then showed them this slide – explaining the string is a number line…

string2.png

I then showed them this slide, which explains what they have to do if they get two of the same number. (I brought cute little clothespins, but mini binder clips or paperclips would have worked just as well):

string3.png

And then I gave them the rules of play:

string4.png

I handed out the cards and let kids go. It was nice to see they didn’t get tripped up as a class on too many of them, but I got to listen to debates over a few trickier ones, which we collectively resolved at the end.

Here are the cards I handed out: .DOC FORM: 2019-04-01 Clothesline Math – Logarithms

Here is a picture of some of the cards. The two on the left are average level of difficulty. The two in the middle caused my kids to pause… it took them time to think things through (they haven’t learned any log properties yet). The one on the right doesn’t belong on the number one (it is undefined) and the kid who got that card immediately knew that. Huzzah!

20190401_172900.jpg

Here’s a picture of the numberline at the end.

20190401_092453.jpg

And… that’s it!

I was excited to try it out as a quick review activity. And it worked perfectly for that!


(Other things of note: Mary Bourassa made a clothesline math for log properties and shares that here. The author of Give Me A Sine blog does something similar here, but has kids create the cards. I couldn’t find anything with basic log expressions — so I made ’em and am sharing them in this post. Chris Hunter has a nice tarsia puzzle that sticks with basic log expressions here, but I wanted to try out clothesline math so I didn’t use that!) But if anyone has others out there involving logs, I’d love to see them in the comments!)

Digits

I’m about to start a unit on logarithms. Kids don’t technically know that yet. To prime them, today I gave both my Algebra 2 classes a warm up. I was super nervous about this, because I haven’t seen a crazy amount of endurance from many of my kids when they get stuck on something. And I was going to give them something totally open-ended! And without a calculator allowed! Gasp!

I asked them to do the following. Think about 2^{60}
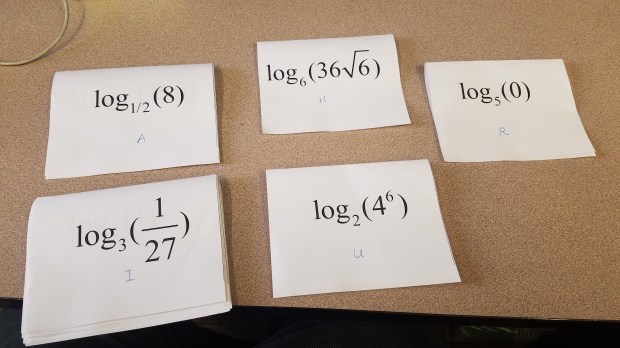
. It’s going to be a long number when it is all written out. I wanted them to come up with a guesstimate about how many digits there are in the expansion. To scaffold, I asked them for three things:

a) What’s a guess (for the number of digits) that is too low? How do you know? (Can you come up with a larger low estimate?)

b) What’s a guess (for the number of digits) that is too high? How do you know? (Can you come up with a smaller higher estimate?)

c) Based on your work and your intuition, if you had to make a guess, how many digits are in the expansion of 2^{60}?

Honestly, it was one of the best things I’ve done recently. Kids were showing grit and so much flexibility in their thinking! I had to correct a few misconceptions and nudge a little here and there, but it was all on them how they wanted to go about this. It was beautiful. (At one point, a kid said they wanted to give up, but I came back around a few minutes later and they were rapidly making progress and hadn’t given up.)

At first, kids didn’t know where to start. I told them they were going to get time to work on this, so they could take on strategies that might take a while. (Normally, we start class with something short and quick. I wanted to indicate this wasn’t that.) Initially, I gave 7 minutes, but since so many kids were on a roll, I expanded it to 14 or 20 minutes. I honestly don’t remember how long.

What I adored is that this problem was definitely in their wheelhouse. Most groups were gung ho, and just started writing stuff down — and eventually (sometimes with a little encouragement/prompting from me), they came up with SUPER awesome solutions. Seriously, things I had never thought of.

The main two approaches I saw were:

  1. Kids noticing that 2^{10}=1024. Which is close to 10^3. So 2^{60}=(2^{10})^6 \approx (10^3)^6=(10^{18}). So that puts us at around 19 digits.
  2. Kids noticing this pattern:
    chart
    So after going up about every 3 exponents, we add an additional digit to the number. (I say about 3 because all groups who did this method saw that a few times, you’d get 4 exponents in a row which keep the same number of digits instead of 3. But it was usually 3.)Assuming the number of digits increases after going up every 3 exponents, that means that exponent 12 has 4 digits, exponent 15 has 5 digits, exponent 18 has 6 digits, exponent 21 has 7 digits… etc. So exponent 60 has 20 digits.

    So that puts us around 20 digits (or maybe a little lower because of those occasional 4 exponents in a row).

That’s about all I wanted to share. I was a little out of my comfort zone because I didn’t know if they would all just throw their hands up and give up. But they didn’t, and instead did some phenomenal thinking.

I just realized… you might want to see how this relates to logarithms. It turns out that the number of digits is equal to doing the following: take the log of the number, and then take the floor function of that result, and then you add one. I won’t spoil it by explaining why, though. See if you can figure it out!

Problem Solving with Trig

So I’m at #TMC17 and Rachel Kernodle nerdsniped me. Or rather, I asked to be nerdsniped. Her session is at a time when there were a lot of other amazing sessions I wanted to go to, so I wanted to know if hers was one where I could hear about it and get the gist of things instead of attending. After some internal debate, she said that since it involved working on a problem, and then using that problem solving to frame the session, the answer was maaaaybe not. But then she thought: maybe I can try the problem on you and see how it goes. As long as you’re willing to put in the time to problem solve. Of course I said yes.

First, you can see her session description, which then framed how I approached the problem:

triangle 2.png

And then this is what she gave me (but it was hand drawn):

triangle.png

From the session description, I knew I had to find the ratio of the side lengths, so I could find exact trig values for angles other than 30, 60, 90, 45.

Rachel also gave me a “hint page” which she told me to look at when I was stuck (and to time how long it took me before I opened it). Let’s just say I’m extremely stubborn, and so as long as I think I have the capability to solve something and I am not completely stuck, I knew I wasn’t going to open it. Turns out my stubbornness paid off, and I ended up solving it.

In this post, I wanted to write a little bit about my experience with the problem. Because now when I look at that triangle, I have an duh, there’s an obvious approach to use here and everything I know points at that obvious approach. And the answer feels really obvious too. It is funny that I’m almost embarrassed to post this because there are going to be people who see it right away, and I worry (irrationally) (math pun) that they are going to judge me for not seeing it as quickly as they did. Even though I know being good at math has nothing to do with speed. And that it was important to go through the steps I did!

It took me over an hour to solve this problem. I had to do a lot of play and make a lot of random leaps before I stumbled across the “obvious approach.”  And I needed to do that in order for me to mine it for lots of things. It was true problem solving. And I know I really deeply understand this because at first the problem looked flummoxing and interesting, and now it looks obvious and somewhat trite. That’s my metric of how I know I deeply understand something. There are still certain things that I teach that I don’t deeply understand: like how the cross product of two 3D vectors yields a third vector perpendicular to the original two. I have done the math, but it’s non-obvious to me why the crazy way we compute cross products give us something perpendicular.(When I only understand something by doing brute algebra, I rarely feel like I get it.)

I’m going to try to outline the messiness that was my thought process in this triangle problem, to show/archive the messiness that is problem solving.

  1. The first thing I noticed was 36 and 36 sum to 72. So I was like: obviously put two of those figures together, and just play around. Something nice will happen. I remember when seeing the problem that approach felt immediate, obvious, and would lead to the solution. I was like yes! I have an inroad! This is going to rock, and I’m going to solve it quickly! And I’ll even impress Rachel!

    pic1

    That appraoch didn’t work. Nothing popped out. I saw 54s and 18s and 144s pop out. But those weren’t angles that helped me. But I did then realize something nice… 36 is a tenth of 360! So I was going to use a circle somehow in this solution. Obviously!

  2. So I drew this:
    pic2
    and I was like, I have something here! But after looking around, I was getting less. You can see I was trying to draw in some other lines lightly and play around — I thought maybe creating other triangles within these triangles would work. But nothing seemed to pop out. At one point, I thought I had possibly created an equilateral triangle in this (even though I saw one of the angles was 72! I was clearly desperate!). I started to get dejected at this point. I knew the circle had something to do with it…
  3. But seeing that 54s and 18s and 36s and 72s kept appearing, I thought maybe algebraically I should play around with the numbers (adding in 180 also, since I can draw a straight line wherever) to see if algebraically I could get a 30, 60, or 45. I tried adding and subtracting numbers from the set {18, 36, 54, 72, 180} looking for 30, 60, or 45. I figured if I could somehow do that, then I could find a diagram that would have angles I could get side relationships from. And then like a domino effect, I could get others. I don’t know. But after like 2 seconds, I got bored with this and didn’t see it as very efficient. My intuition was strongly saying I was going in the wrong direction. So I stopped:

    pic4

  4. At this point, I was pretty dejected. I was slightly losing interest in the problem, thinking it was too hard for me. I tried to “force” a 60 degree angle in a diagram of that original blasted triangle. Hope! And then hope dashed!

    pic3
  5. Damnit! I know the circle had something to do with it. It is just too nice to abandon the circle! Maybe…

    At first I drew all ten vertices for a 10-gon. I started connecting them in different ways. I thought I could exploit the chord-chord theorem in geometry, but that wasn’t good. I tried in that second diagram to extract part of the circle diagram and investigate it more. And the third was just more of the same. At one point, I was like e^{i\theta}=\cos\theta+i\sin\theta 
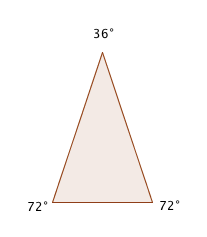
and was thinking I could somehow think of this as a problem on the complex plane, where each vertex was e^{ni\pi/5} and then look at the real parts for the x-coordinate and the imaginary parts for the y-coordinate. Clearly my mind was whirring, and I was going anywhere and everywhere. I actually thought maybe this complex plane thing seems ugly but it will be so elegant. But then I realized I didn’t know where to go if I labeled each of the points on the complex plane. Done and done and doneAt this point I put the problem away. Nothing was working.

  6. But after a minute, I couldn’t let it go! I wanted to solve it!!! So I went back. I thought I was getting too complicated, so I went simple.

    pic8

    Nope. Didn’t help. But for some reason, this diagram and looking at the 72 reminded me of something I hadn’t thought of before. This is the leap that helped me get to the answer. And I can’t quite explain why this diagram sparked this leap. Which sucks because this is that moment that led to the rest of the problem for me! But I immediately remembered something about 72s and pentagons. And it hit me.

  7. So I drew what this connection was. My brain was whirring, and I was somewhere good…  
    pic9

    I remembered the 72 degree angle appeared in a star. And this star was related to a pentagon. And that the pentagon had something about the golden ratio tied up in it. So I knew that maybe the golden ratio was involved in the answer. And where does the golden ratio appear? When there are similar triangles and proportions. I had my new approach and my inroad that I thought would work. Two triangles next to each other failed. Circles failed. But star/pentagon might work!

  8. So I looked at the original triangle and tried to figure out where I could find a similar triangle. And so I drew one line and created a similar triangle. I labeled the two legs as having length “1.”
    pic10.PNG

    Initially, I was thinking I could do something with the law of sines. Because if you think about it, this is the ASS case — where you have that 36 degrees (circled), the side I labeled 1 (circled), and the other side I labeled y (circled). But you note that last side could be in two different places, which is why there are two ys circled. I still think there is something fun that I could do with this. But as I was doing this, I realized I was making things more complicated.

    I knew that the golden ratio came out of a proportion. So I abandoned the law of sines for the proportion. I simply set up a proportion with the two similar triangles. I first found “?” by doing 1/y=y/?. So ? was y^2This was exciting. I knew the golden ratio came out of solving a quadratic. Yeeeeee! At this point, my excitement was growing because I was fairly confident I was almost at the solution.

    Then I labeled the part of the leg that wasn’t ? as 1-y^2 (since the whole leg length was 1). Finally I looked at the third triangle in the diagram that wasn’t similar to the original triangle. It was isosceles and has legs of y and 1-y^2 so I set them equal and solved and not-quite-the-golden-ratio came out! (There was a mistake I made where I set y^2=1-y^2 and got y=\sqrt{2}/2. But I then found it and rewrote the equation y=1-y^2. This was the most depressing part of it. Because I couldn’t find my error because I was so tired. I went through my work multiple times and nothing. But taking some time away and then looking with fresh eyes, it was like: doh!)

    And so that was the end. I found if the original triangle had leg lengths of 1, the base was going to have a length of \sqrt{5}/2-1/2.

    I was so proud. I was on cloud nine. I was telling everyone! SO COOL!!! 

It probably took me in total 90 minutes or so from start to finish. So many false starts at the beginning, and one depressing transcription error that I couldn’t find.

The point of this post isn’t to teach someone the solution to the problem. I could have written something much easier. (See we can draw this auxiliary line to create similar triangles. We use proportions since we have similar triangles. Then exploit the new isosceles triangle by setting the leg lengths equal to each other.) But that’s whitewashing all that went into the problem. It’s like a math paper or a science paper. It is a distillation of so freaking much. It was to capture what it’s like to not know something, and how my brain worked in trying to get to figure something out. To show what’s behind a solution.