Technically I’m still on Spring Break, but this all ends next week, when we go back to school remotely. I’m one of the lucky few who didn’t have to get thrown into the fire immediately, so I’m using this blogpost as a way for me to sort through what I’ve done and what my take-aways are. I’ll be updating this as new things come my way, so I can keep track of everything useful in one spot.
My dear friend @rdkpickle
So my friend @rdkpickle had to start distance teaching already. She’s kinda amazing in all the ways, and so on twitter she shared out how she was doing her lessons — and noted that they’ve been going well. They are low-tech in that they use Zoom and Google Docs, and use a Google Doc as an anchor for the lesson. I love that the doc allows kids who have to miss the lesson for whatever reason (emotional/anxiety issues, having to take care of a sibling, etc.) have a way to keep up.
Before sharing it, I want to say: seeing what she did was the very first thing that I saw that made me feel like: “okay, I can do this. It’s doable.” BLESS. When talking briefly with her online, she was saying right now she couldn’t be all investigatory in the same way she was in class, almost like she was ashamed. BUT very little of we’re doing is going to be like what we do in class. The ballgame has changed (from basketball to some other sportsball!). Right now, for me, the question is can I give space and structure and community to kids where they feel they can learn a few things. And @rdkpickle’s low-tech approach allows for that!
Here’s a PDF her googledoc, which she said I could share. (And here’s the google doc.)
Zoom
Mike Flynn (helped by Sarah Bent) gave two wonderful webinars on distance learning that he has put online — March 11th and March 17th. (If you only have time for one, I’d watch the second one, but both are great.) They were some of the first things that made me realize distance learning was possible, by showing how to do it through his webinar. (Unlike, say, dry powerpoint lectures on teaching active learning strategies. Ahem. We’ve all been there. I just think over and over, “Physician! Heal thyself!”) My takeaways were both about distance learning and about zoom, so I’ll list them here. Fundamentally, though, the best way to learn zoom is to actually just get a few friends and all try it out together (each of y’all practicing being the leaders/hosts of the meeting).
- If you can, start the zoom meeting 10-15 minutes early and let kids know you’ll be there. You can just have informal chats like you do before a normal class, and you can use that as an easy way to start building community.
- You can record your sessions, but if you do that, don’t start recording during that informal chat time. (Right now, since Zoom is overloaded, it’s taking them a long time to get the recorded sessions on their website, FYI. But you can have zoom do a “local recording” on your laptop… so I was thinking if the file were small enough, I could just upload that to a google drive folder my kids could access.) Note that the chat box doesn’t show up on the recording.
- Talk with kids explicitly about the weirdness of talking on Zoom. There are going to be awkward pauses because we can’t use facial cues and body movement to figure out if we’re going to talk or not (we’re all sort of trained to sort of check before we talk so we don’t start at the same time as someone else). So name that, and say that awkwardness is normal in zoom. You should also mention (and give) lots of wait time — just like we should be doing in our regular teaching.
- It’s okay if you’re having kids use chat to stop every so often and take a few minutes (in silence) to read over the chat so you can respond to what you’re seeing.
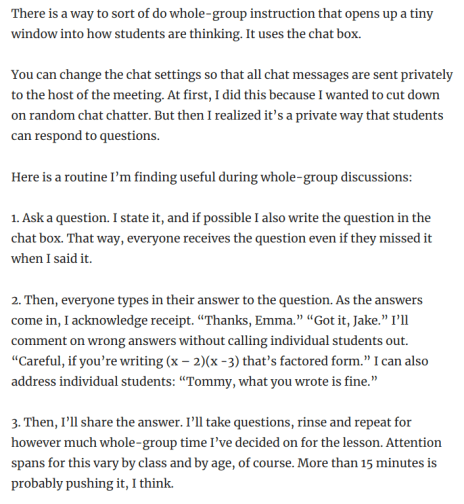
- The chat can be the “lightest lift” for interactivity, but it’s effective! One tip I got on twitter is that you can ask everyone to write a response to a question, but not press enter until you give the command. Then you’ll get a quick flood of responses that you can go through, and students can also read.
- You can also set the zoom meeting to have the chat be private – so students are talking to you but not each other… then as you see the responses, you can say “Nice thinking, Jake!” or “If you’re thinking about a parabola instead of an exponential function, you’re going in the wrong direction!” This came directly from Michael Pershan’s experience teaching online this past week:
- If you have pre-determined questions you want to ask at a particular time during the lesson, have them written in a google doc/notepad, so when you want to ask it, you can just copy/paste them in.
- Have everyone use their own regular names in zoom (and not emails or userhandles) to make life easier for you.
- There is a way to include “polls” in your zoom meetings, but I couldn’t figure that feature out when trying it out!
- You can divide your class into groups (either randomly or pre-determined) and send them to breakout rooms. You can visit any of those rooms and join in the conversations. Each breakout room is given a number when students join. You can have one person in each group (e.g. the person whose last name comes first alphabetically) to create a Google Doc in a Google Drive Folder you share with them in the chat window… And title it “Group 5, March 25, 2020.” Then all participants can write answers in their google doc and you have access to all of them in an organized way.
- When students are first put into a breakout room, if they’re new to working with each other, start with a non-mathy but quick ice-breaker to get everyone talking (e.g. what’s your favorite pizza topping?) and build a tiiiiny bit of community before diving in.
- SUPER COOL DISCOVERY: When I did this in Mike Flynn’s webinar, one person in my breakout room showed me a ridiculously cool feature. In any google doc, you can go to INSERT > IMAGE > CAMERA
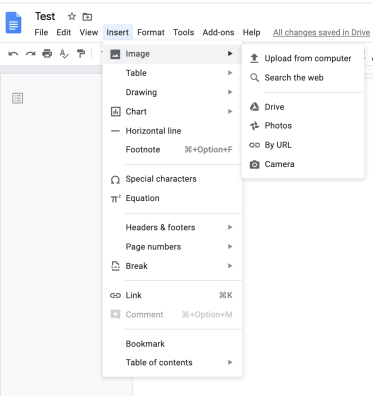
And then you just take a picture of your work using the webcam, and it automatically inserts the picture in the google doc!
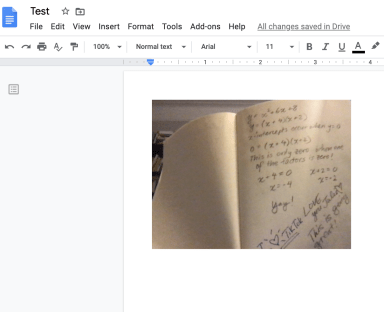
Bam!
- Don’t go crazy with the new technology. There are so many apps and websites. Limit yourself to just a few, like two, for your own sanity and your students’ sanity. Keep it simple and easy — don’t go down the rabbit hole of looking for “the perfect way to do x, y, or z.” Be okay with the tradeoff of having “good enough.”
- When designing online learning, start with the question “how do we want our students to learn?” Then choose your technology based on that.
- Screensharing is awesome (so you can set up a google slideshow, and in zoom you can screenshare that slideshow to the kiddos… And you can show kids how to annotate so individuals or the whole class and write/type/draw on a screen you’re sharing (and you can save that).
Desmos Activity Builder
Julie Reulbach led a webinar on using desmos for assessments, but basically she outlined all the ways we could create activity builders to actually teach content also, and bring students along with us as they navigate the pages, and we talk through what they’re doing. Her resource page is clipped below so you can see what’s there…
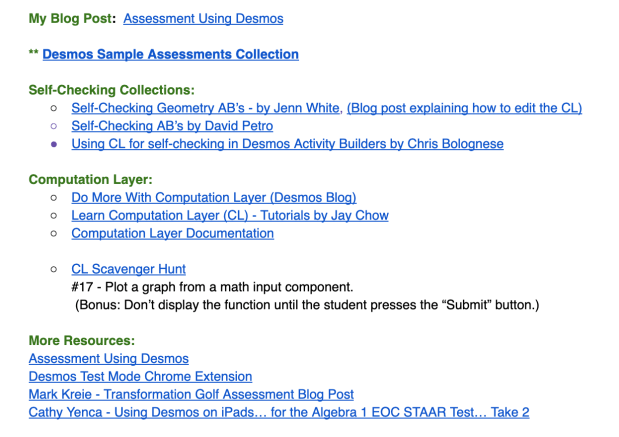
But importantly, her page includes links to various activity builders where you can simply copy and paste! Here’s how you copy and paste screens from better activities that your own into your own! They can even have computational layer in them!
Some key tips for creating Activity Builders (but not necessarily for assessments in particular):
- Steal steal steal screens from other activity builder assessments if you’re doing anything fancy (e.g. self checking, anything with computation layer), because there’s no need to reinvent the wheel right now. Julie has curated a whole list of activities that she takes screens from! And desmos has curated a bunch of starter screens(e.g. “graph how you’re feeling today?”) that you can take!
- DESMOS NOW ALLOWS FEEDBACK – so you can write a note to individual students.
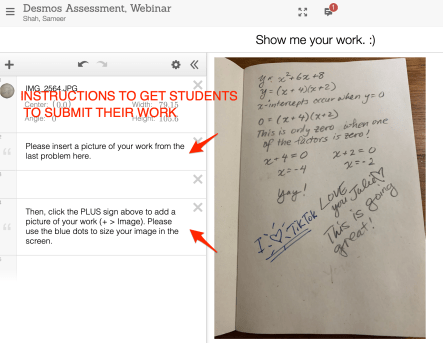
https://www.youtube.com/watch?v=P-ebHOily6k&feature=emb_logo - Importantly, let’s say kids are doing a desmos activity or assessment, and you want them to show their work that they’ve done on paper. All you need to do is create a screen which has a blank graph, and instruct kids to insert an image (see sidebar instructions in the image below) and they can actually INSERT a picture of their work! The workflow is a little clunky because they have to take a picture on their phones and then email/airdrop it to their laptops, and then select that file. But it took me only like 20 seconds after I had done it once.
Some key tips for using Desmos for assessments:
- Have kids log in with their name, but “last, first.” That way when you grade their online assessment, you can sort the responses by their username, and that will match your gradebook.
- Have a fun introductory “hi there!” screen
- Have students fill out an honor code/statement screen first if doing a formative assessment
- After you finish the activity, have two screens at the end. First, a feedback screen so you can find out how they felt it went. Second, a screen asking them if they have any questions or anything they want you to know.
- If a formal assessment, you should PAUSE the activity at the end — so kids can’t go back and change their answers or share the class code with other kids
Michael Pershan’s blogpost
My friend Michael Pershan has been in the thick of online teaching. He wrote a detailed blogpost about what he’s discovered thus far. I highly recommend reading it! Big takeaways:
- His school is using Google Classroom (like ours does), so he’s using that to create a system of organization for the kids, with instructions given day-by-day (within a unit):
He noted: “The most important thing, though, is that each learning activity becomes its own “assignment.” During week 1 I was creating large documents that students were working on over multiple days. This was good in one sense, because I had to post only one thing. But it became very difficult to monitor the progress of kids through the assignment at all. And then it became tricky to modify the plan in the middle of the week by adding on other bits of classwork.” - He’s using google classroom to teach kids how to upload their written work. (Note: my kids always submit PDFs of their work on google classroom, so they’re very familiar with this!)
- To give feedback on google classroom: “Google lets you comment on the work itself via highlighting and commenting, but I’ve found it more useful to give a quick written comment that appears under the assignment itself.”
Lots of great things being shared on twitter. It was so overwhelming that I stopped looking at twitter for a while, but I did save a few things:
https://twitter.com/rebeccajrucker/status/1239310493791240198
https://twitter.com/JennSWhite/status/1239963029233496066
https://twitter.com/MrCBRobinson/status/1240642486286123008
What Wasn’t That Useful For Me – But Here are the Nuggets I’ve Taken Away From These
What I have below doesn’t mean these aren’t good for others. It just means that for me, I like to jump in and these things didn’t quite pan out fully.
Alice Keeler had a webinar (“Oh Crap, I’m Teaching Math Online Now“) that wasn’t crazy useful for me because it was a brief overview of many things I already knew about. It was just super tech happy (look at Pear Deck! Look at Geogebra! Look at Desmos! Look at …) and didn’t give me the focus or vision I’m searching for.
Global Online Academy (GOA)’s 1 week course on Designing for Online Learning. Since this was designed to be “big picture” (so it can accommodate people from many schools and teachers of all stripes and many disciplines), I had trouble getting specifics that I wanted to latch onto. Here’s what I did get:
- They recommended Loom for laptop screen recording, if you were going to be making videos from your laptop. It seemed pretty seamless and easy to use, based on this short video tutorial:
https://www.youtube.com/watch?v=OvRVJ46ffoQ - The basics of good teaching are still important — clarity and being organized is paramount. Specifically for online learning, they highly recommend:
- building routines early (just like with regular teaching!)
- share the “learning goals” at the start of each lesson explicitly
- don’t get over-excited and share too much… curate what you share and make it super easy to follow
- using a lot of whitespace and images
- don’t include anything that isn’t super important — focus on key ideas
- not using too many fonts
- everything you share with your students should be “crisp” and “clean” (not “busy”)
- Be present for students. Create or adopt an online persona. Don’t leave them hanging, but show them continual engagement so they know you’re with them on this journey.

I didn’t make it through all of Mike’s Webinars so I’m not sure if it was mentioned. You commented that you couldn’t figure out polls. I’ve taken a class through Zoom and I use a chromebook. The features in the chrome version are more limited, so if you use it with students they may not have access to polls, annotating on the screen, and some if the other features.
That is super helpful!!! Thank you for taking the time to share that with me!
Sam, Thank you for posting this. Rachel (@rdkpickle) has been awesome in leading our department and building a cooperative space for us to learn this new normal together. As we just went on spring break, I thought I would share one of my big learnings from the past two weeks of distance learning based on feedback from students and my own 11th-grade son. My big two takeaways this week were (and they seem obvious after the fact) – less is more and get kids off screens when you can. We were synchronous these past two weeks and students really struggled when teachers attempted to do what they had normally been doing in a Zoom environment – keeping homework, assessments, class time, etc. the same as before – students expressed being overwhelmed with work at a time when they too were learning a new environment, dealing with being home with other people while taking classes, feeling socially (physically) isolated from friends, etc. This leads into the second point – students had too much online time each day – after 6 hours of Zoom classes during the day most reported 2 to 4 hours of homework each night, often on a computer – and that they were struggling. Feedback from kids was that they appreciated times when their work was pencil/pen on paper and they could be away from a computer. The line between classwork and homework has been blurred – take a step back and don’t make kids do “practice” in class that is followed by similar “practice” for homework – either just do one, or make sure they are different – I advocate for a lot less homework for the students and using “exit tickets” at the end of class to check-in on how a student did, then you can follow up with students who maybe need help. My last thought is to pay attention to students who were struggling in your class before going online, they are most likely going to struggle more now – you can’t see what they are doing in class by circulating, they might not be keeping up with the material as well in this environment, and they will be less likely to ask for help (Zoom favors the extroverts and kids who want to speak – breakout groups help with this, but it still happens). Schedule check-in times with kids who need help. Thank you again for posting this blog – the online community of math teachers is the best support for all of us moving forward. Good luck when you return to school!
I appreciate these resources, Sam. Thanks for sharing. I think the strategy you shared from @rdkpickle would work well for my students. I don’t have a ScribD account, but the link to the google doc took me to TikTok. I’ll check back to see if there’s an updated link, but should be easy enough to recreate one from the preview (the doc, not the TikTok vid, of course).