TL;DR: If you have an extra 45-60 minute class and want to expose your 9th/10th/11th/12th graders to a mindblowingly huge number and show them a bit about modern mathematics, this might be an option!
In one of my precalculus classes, a few kids wanted to learn about infinity after I mentioned that there were different kinds of infinity. So, like a fool, I promised them that I would try to build a 30 minute or so lesson about infinity into our curriculum.
As I started to try to draft it — the initial idea was to get some pretty concrete thinkers to really understand Cantor’s diagonalization argument — I decided to build up to the idea of infinity by first talking about super crazy large numbers. And that’s where my plan got totally derailed. Stupid brain. At the end of two hours, I had a lesson on a crazy large number, and nothing on infinity. You know, when that “warm up” question takes the whole class? That’s like what happened here… But obvi I was stoked to actually try it out in the classroom.
In this post, I’m going to show you what the lesson was, and how I went through it, with some advice for you in case you want to try it. I could see this working for any level of kid in high school. Now to be clear, to do this right, you probably need more than 30 minutes. In total, I took 35 minutes one day, and 20 minutes the next day. Was it worth it? Since one of my goals as a math teacher is to try to build in gaspable moments and have kids expand their understand of what math is (outside of a traditional high school curriculum): yes. Yes, yes, yes. Kids were engaged, there were a few mouths slightly agape at times. Now is it one of my favorite things I’ve created and am I going to use it every year because I can’t imagine not doing it? Nah.
We started with a prompt I stole from @calcdave ages ago when doing limits in calculus.

Kids started writing lots of 9s. Some started using multiplication. Others exponentiation. Quite a few of them, strangely, used scientific notation. But I suppose that made sense because that’s when they’d seen large numbers, like Avagadros number! I told them they could use any mathematical operations they wanted. After a few minutes, I also kinda mentioned that they know a pretty powerful math operation from the start of the school year (when we did combinatorics). So a few kids threw in some factorial symbols. Then I had kids share strategies.
Then I returned to the idea of factorials and asked kids to remind me what 


Yup, that number is super big.
Then I introduced the goal for the lesson: to understand a super huge number. Not just any super huge number, but a particular one that is crazy big — but actually was used in a real mathematical proof. And to understand what was being proved.
Lights go off, and we watch the following video on Graham’s number. Actually, wait, before starting I mention that I don’t totally follow everything in the video, and it’s okay if they don’t also… The real goal is to understand the enormity of Graham’s number!
I do not show the beginning part of the video (the first 15) because that’s the point of the lesson that happens after the video. While watching this, kids start feeling like “okay, it’s pretty big” and by the end, they’re like “WHOOOOOOAH!”
Now time for the lesson… My aim? To have kids understand what problem Ronald Graham was trying to understand when he came up with his huge number. What’s awesome is that this is a problem my precalculus kids could really grok. But I think geometry kids onwards could get the ideas! (On the way, we learned a bit about graph theory, higher dimensional cubes, and even got to remember a bit about combinations! But that combinations part is optional!)
I handed out colored pencils (each student needed two different colors… ideally blue and red, but it doesn’t really matter). And I set them loose on this question below.
It’s pretty easy to get, so we share a few different answers publicly when kids have had time to try it out. The pressure point for this problem is actually reading that statement and figure out what they’re being asked to do. When working in groups, they almost always get it through talking with each other!
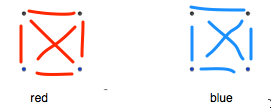
One caveat… While doing this, kids might be confused whether the following diagram “works” or if the blue triangle I noted counts as a real triangle or not:

It doesn’t count as a real triangle since the three vertices of the triangle aren’t three of the original four points given. During class I actually made it a point to find a kid who had this diagram and use that diagram to have a whole class conversation about what counts as a “red triangle” or “blue triangle.”. Making sure kids understand what they’re doing with this question will make the next question go more smoothy!
Now… what we are about to do is super fun. I have kids work on the extension question. They understand the task (because of the previous one). They go to work. I mention it is slightly more challenging.
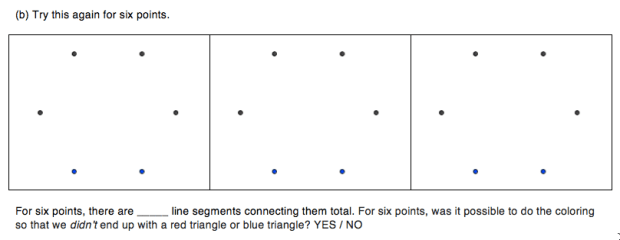
As they work, kids will raise their hand and ask, with trepidation, if they “got it.” I first look to make sure they connected all the points with lines. (If they didn’t, I explain that every pair of points needs to be connected with a colored line.) Then I look carefully for a red or blue triangle. Sometimes I get visibly super excited as I look, saying “I think you may have gotten it! I think you may… oh… sad!” and then I dash their hopes by pointing out the red or blue triangle I found. (So here’s the kicker: it’s impossible to draw all the line segments without creating a red or blue triangle… so I know in advance that kids are not going to get it… but they don’t know this.) After I find one (or sometimes two!) red or blue triangles, I say “maybe you want to start over, or maybe you want to start modifying your diagram to get rid of the red/blue triangle!” Then they continue working and I go to other students.
(It’s actually nice when students try to modify their drawings, because they see that each time they try to fix one thing, another problem pops up. They being to *see* that something is amiss!)
This takes 7-8 minutes. And you really have to let it play out. You have to ham it up. You have to pretend that there is a solution, and kids are inching towards it. You have to run from kid to kid, when they think they have a solution. It felt in both classes like a mini-contest.
Then, after I see things start to lag, I stop ’em. And then I say: “this is how you can win money from your parents. Because doing this task is impossible [cue groans… let ’em subside…] So you can bet ’em a dollar and say that they can have up to 10 minutes.!That it takes great ingenuity to be successful! What they don’t know is… you’re going to get that dollar! Now we aren’t going to prove that they will always fail, but it has been proven. When you have six or more dots, and you’re coloring all lines between them with one of two colors, you are FORCED to get a red or blue triangle.” [1]
Now we go up a dimension and change things slightly. Again, this is a tough thing to read and understand so I have kids read the new problem aloud. And then say we are going to parse individual parts of it to help us understand it.
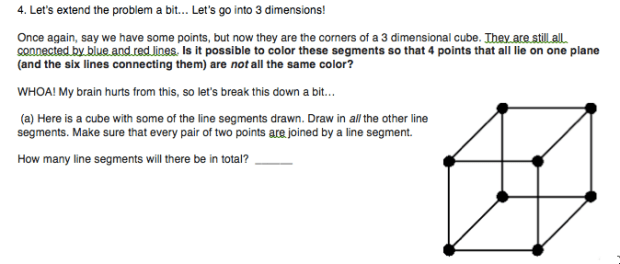
And then… class was over. I think at this point we had spent 35 minutes all together. So that night I asked kids to draw all the line segments in the cube, and then answer the following few questions:
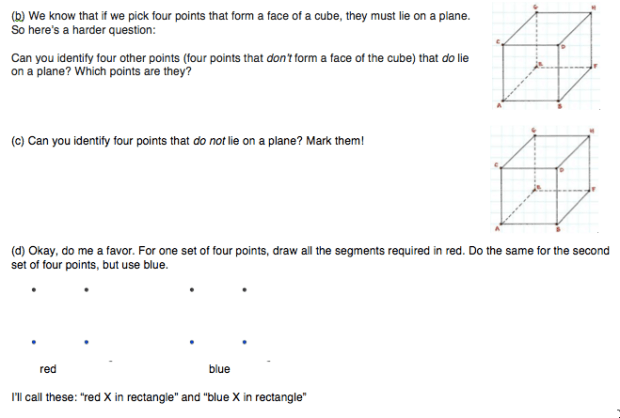
These questions help kids understand what the new problem is saying. In essence, we’re looking to see if we can color the lines connecting the eight points of a cube so that we don’t get any “red Xs” or “blue Xs” for “any four points in a plane.” Just like we were avoiding forming “red triangles” and “blue triangles” before when drawing our lines, we’re now trying to avoid forming “red Xs” and “blue Xs”:
So the next day, we go over these questions, and I ask how this new question we’re working on is similar to and different from the old question we were working with. (We also talk about how we can use combinatorics to decide the number of line segments we’d be paining! Like for the cube, it was 


It’s funny, but it took kids a long while to find the “red X” in the left hand image. Almost each class had students first point out four points that didn’t form a red X, but was close. But more important was the right hand figure. No matter how hard you look, you will not find a red X or blue X. Conclusion: we can paint these line segments to avoid creating a red X or blue X. Similar to before, when we had four points, we could paint the line segments to avoid having a red triangle or blue triangle!
So now we’re ready to understand the problem Graham was working on. So I introduce the idea of higher dimensional cubes — created by “dragging and connection.” I don’t take forever with this, but kids generally accept it, with a bit of heeing and hawing. More than not believing that it’s possible, kids seem more enthralled about the process of creating higher dimensional cubes by dragging!
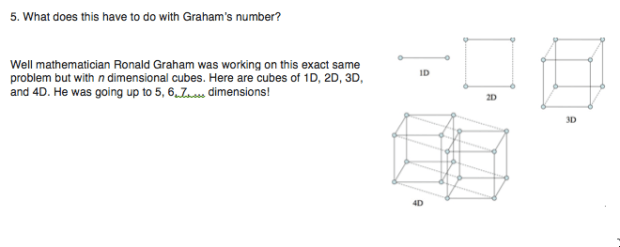
And then… like that… we can tie it all together with a little reading:

And… that’s the end! At this point, kids have been exposed to an incomprehensibly large number. And kids have learned a bit more about the context in which this number arose. Now some kid might want to know why we care about higher dimensional cubes with connecting lines painted red/blue. Legit. I did give a bit of a brush off answer, talking about how we all have cell phones, and they are all connected, so if we drew it, we’d have a complex network. And analyzing complex networks is a whole branch of math (graph theory). But that’s pretty much all I had!
In case it’s helpful: the document/handout I used: 2017-04-04 Super Large Numbers (Long Block).
[1] I like framing this in terms of tricking their parents. We’ve been doing that a bunch this year. And although I understand some teachers’ hesitation about lying to their students about math, I think if you frame things well, don’t do it all the time, it can be fine. I don’t think any student felt like I was playing a joke on them or that they couldn’t trust me as their math teacher because of it.

This is great!! I’m going to try it!!
Awesome! Tell me how it goes when you do!
Thanks for this post. I really enjoyed feeling the beats of your classroom while reading.
Thanks!
Awesome! Really enjoyed this post.
Annoyingly mathematicians define double factorial in unexpected ways, so 5!! < 5!
(!)
http://mathworld.wolfram.com/DoubleFactorial.html
Frustrating!
aahhh! I recently saw this somewhere, and clearly promptly forgot it. That is SUPER annoying! Silly mathematicians!
I did this with my smart eighth graders a couple of months ago. I believe it was spurred by them trying to out number each other, and jumping to infinity even before they got to googolplex.
I skipped graham’s proof, and rather focused on how Knuth’s up arrow notation expands our current arithmetic operations.
I think I also roped in this problem: https://projecteuler.net/problem=188
They had fun running with it, and realized that you could get into absolutely silly territory by increasing your recursion abstractions repeatedly, and *still* not get close to infinity.
Comment emailed to me, saved for future reference:
http://waitbutwhy.com/2014/11/1000000-grahams-number.html
This is actually part 2 of his numbers post. Part 1 is here [http://waitbutwhy.com/2014/11/from-1-to-1000000.html], if you are interested.