Geometry

Radical Musings

This is a short post to archive some thinking I did on the subway home from work today. I had a Geometry class today and it was clear to me that their understanding of radicals was … not so good. And I don’t think it is their fault. I remember teaching Algebra II years ago and tried building up some conceptual understanding so puppies don’t have to die… and it was tough and I didn’t really succeed:

puppy

(Poster made by the infinitely awesome Bowman Dickson.)

I also remember having this exact same conversation with my co-teacher last year. We considered the following “thought exercise.”

How would you explain to a student in Algebra I why \sqrt{15}=\sqrt{5}\sqrt{3}?

I would like to add the corollary “thought exercise”:

How would you explain to a student in Algebra I why \sqrt{15}\neq\sqrt{10}+\sqrt{5}?

And so on the subway home, I thought about this, and had the same insight I had last year.

We define (at least at the Algebra I level) \sqrt{15} to mean “the number you multiply by itself that yields 15.”

I want to highlight the concept more than the notation, so let’s call that number \square.

So for us \square is “the number you multiply by itself that yields 15.”
Now let’s similarly call \heartsuit “the number you multiply by itself that yields 5.”
And let’s call \triangle “the number you multiply by itself that yields 3.”

We know from this \square \cdot \square=15. Why? Because that’s the definition of “square” for us.

But we also know \heartsuit \cdot \heartsuit=5 and \triangle \cdot \triangle=3 for the same reason.

Thus we know \heartsuit \cdot \heartsuit \cdot \triangle \cdot \triangle=\square \cdot \square.

Here’s the magic.

Let’s rearrange:

\heartsuit \cdot \triangle \cdot \heartsuit \cdot \triangle = \square \cdot \square .

Study this a minute. It takes a second (or it might for students) to see that \heartsuit \cdot \triangle = \square.

Now remember I used symbols because I wanted to focus on the meaning of these objects, not the notation.Let’s convert this back to our “fancy math notation.”

\sqrt{5} \sqrt{3}=\sqrt{15}

So that gets at our first “thought exercise.”

I wonder if trying the same with the second thought exercise might work? The tricky part is that we’re trying to show a negative statement. I know… I know… most of you probably say “hey, just show the kids \sqrt{1+4}\neq\sqrt{1}+\sqrt{4}.” But that doesn’t stick for my kids!

So let’s try it: for us \square is “the number you multiply by itself that yields 15.”
Now let’s similarly call \clubsuit “the number you multiply by itself that yields 10.”
And let’s call \spadesuit “the number you multiply by itself that yields 5.”

So:
\square \cdot \square=15.
\clubsuit \cdot \clubsuit=10
\spadesuit \cdot \spadesuit=5

Then challenge students do something similar to show that \square = \clubsuit + \spadesuit. They hopefully will start failing in their endeavor!

I predict they will start with: \square \square = \clubsuit \clubsuit + \spadesuit \spadesuit. Yay. That’s true… So from that true statement, they are going to try to show that \square = \clubsuit + \spadesuit.

But they can’t really go anywhere from here. They’re stuck. I still predict some weaker students may say: “But clearly we can just say \square =\clubsuit + \spadesuit. It’s like you have “half” of each side of the equation!” But it is at this point you can ask students to do two things:

1) Ask ’em to show the algebraic steps that allow them to make that statement. There won’t be valid steps. And in this process, you can see what other horrible algebraic misconceptions your students have (if any).

2) Or say: okay, let’s see if you’re right. If \square =\clubsuit + \spadesuit, then I know \square \square=(\clubsuit+\spadesuit)(\clubsuit+\spadesuit). And as soon as you start distributing those binomials, they’ll see they don’t get \square \square = \clubsuit \clubsuit + \spadesuit \spadesuit (our original statement).

Okay I just needed to get some of my initial thoughts out. Maybe more to come as I continue thinking about this…


Advertisement

Snug Angles

In Geometry this year, I wanted to write a few more problems to have kids practice with angles of regular polygons… so as I was coming up with a few problems, I realized they had a nice theme to them.

“Which polygons fit together snugly? Which don’t?”

[02 Snug Angles download][Note: There is a typo on #6… It refers to problem 2d, but it should refer to problem 2c]

I made this the day before the class I was going to teach it. But I wanted to have a hands-on “playful” component to this. I asked teachers in my school if they had regular polygon tiles with the same side length… I got a set which included triangles, squares, and hexagons. No pentagons, no heptagons, no nonagons, no decagons, nada.

Of course these tiles were probably produced for lower school kids precisely because they fit together “snugly” at a vertex. But no “play” could really happen if sometimes things didn’t fit nicely together. So — for future reference — I asked on twitter to my math peeps if anyone knew where I could buy regular polygon tiles of all sorts. No links were forthcoming. Sigh.

In class, I expected #1 to be challenging. I wanted students to come up with a reason they had found all the possible regular polygons (of one kind) that fit snugly together. It was nice to see students reason through it, and when we came together as a class, we had a few different cogent explanations. Some involved calculating all possible factors of 360. Some involved recognizing that the more sides you have in a polygon, the fewer of them can fit together “snugly” at a vertex (and the minimum number of polygons that can fit at a vertex is 3).

Although I was expecting #2c to be challenging, I didn’t realize how challenging it would be. I thought I had built a scaffold with the previous problem so it wouldn’t be too hard. What turned out to be the problem? The fact that a regular 7-gon had a non-integer interior angle value. Kids didn’t know that could happen, and that really threw them. Also: setting up the equation was challenging, because kids were confusing “the sum of the interior angles in a regular n-gon” with “the measure of one interior angle in a regular n-gon” (a calculation they had never been formally taught, and were supposed to figure out themselves during this exercise).

I’d say only about half the groups could deal with 2c without any help.

However, all groups ended up being successful. And I just graded their assessments on polygonal angles, and almost every single student got the problem that was similiar to 2c!

The very last question asks students to discover as many possible combinations of regular polygons that could fit together snugly at a vertex. I assigned this as a nightly work problem — and the next day, students came in with lots of great combinations. Unfortunately, I didn’t do anything with this. I should have — but I felt pressed for time.

We could have talked about why 6 polygons were the maximum number that could fit together, or 3 polygons were the minimum number that could fit together. That could reduce our searching! Then I could have asked how people approached the task. Guess and check? Geogebra? Is there a systematic way they could have approached this problem — if they had infinite time and patience — that they could guarantee they had found all possible combinations? Do all combinations need at least one 3, one 4, one 5, or one 6?

Or we could have spent some more time looking at all possible combinations. Some kids noticed — after looking at the comprehensive list I threw on the board after they finished sharing their values with me — that many of the values had common factors: so 3, 7, 42 is one crazy combination that works. And both 3 and 7 are factors of 42. What else could we find?

What I’m trying to say is: the last question was kind of a dumb question to put on the sheet without having a good way to debrief it, and a meaningful conclusion we could have gotten from it. Sigh.

Okay, on to the exciting part. I said I asked on twitter if anyone had a site to buy these tiles. No responses. BUT Christopher Danielson then asked what I was looking for. Kate Nowak jumped on the bandwagon and brainstormed what a teacher might want, ideally. Yesterday, I came home from school and had a box waiting for me. In it:

20160116_130324

They are beautiful. And gosh do they smell awesome. Real wood, that smells awesome. I was in heaven when I saw them. So beautiful.

And even more satisfying: you’ll notice that the 3, 7, and 42 fit snugly together!

Now the million dollar question: assuming I had however many of each tile I wanted, what would I do with them? How would I restructure the unit to use them in a way that is compelling? I wanted the tiles initially because I thought some “play” with the tiles would be fun, before delving into the algebra to see the justification of why some work and some don’t work. But I want something more! Something that will have them figure out the 3, 7, 42 connection and gasp! And the 4, 5, 20. And the 3, 8, 24. And the 3, 10, 15. And the 4, 5, 20. And GASP with surprise and horror and delight!


I don’t quite know… But maybe envelopes with index cards in them. And some of the index cards have some configurations they have to “check” to see if they work or not. And some of the index cards have two of the tiles, and students have to see if there is a third tile that works. And for each configuration that works, students get to come to the front of the room, grab those tiles, and check to see if their algebra worked by checking to see if the tiles truly do fit snugly. If they do: they record their discovery on the board for all to see. And by the end of the class, students will have had practice, and in the last 5 minutes, we could all gather at the front, and view some of the weird snug angle configurations together. And see how configurations that are “close but no cigar” don’t work (like 3, 10, 16… which is close to 3, 10, 15). When doing this, we could also talk about why 4, 10, 15 is “worse” than 3, 10, 16 in fitting snugly.

That’s all my musings for today! I’m going to be chaperoning a trip to Spain in a few days, and that will last two weeks, so goodbye for a while!

Blermions, Cyclic Quadrilaterals, and Crossed Chords

Update: Here is the most recent post about implementing this activity in class. And here is a post about an extension I did on this — involving merblions. I highly recommend reading those! These were some of my favorite days in my geometry class this year!

Last year in Geometry, the other teacher and I weren’t pleased how we introduced the crossed chord theorem. Basically, we ran out of time to come up with a *great* idea and instead had kids measure some things, take the products, and see that the theorem held true. Not our style. We were doing the heavy lifting and kids were making the connection that was served up on a platter.

When we met last week, we decided to rectify this. We brainstormed some general ideas, and I turned those into this activity.

The setup: Kids are so used to looking at “normal” quadrilaterals in geometry. So we thought we’d exploit that. We don’t mention circles. We don’t mention chords.

The TL;DR version: students investigate all quadrilaterals where the diagonals satisfy the property that ac=bd. Students are guided to make a conjecture which we as teachers know will be wrong. Then we show a counter-example to blow their conjecture up. And them bam: they have to try again. Using geogebra and some more encouragement, students discover that all cyclic quadrilaterals satisfy ac=bd. And so the circle emerges out of this investigation of quadrilaterals and diagonals. This is, then, the crossed chord theorem. Which students got at by investigating quadrilaterals. Weird. Now they are in a prime place for wondering why the circle shows up. Proof time!

Here’s the start: we introduce a new type of quadrilateral called a “blermion.” (.docx here)

01_Crossed_Diagonals__new__pdf__page_1_of_2_

We had some debate over whether we were giving too much away with this start [1], but we decided we weren’t. (We’re going backwards. The students aren’t deriving the formula. They’re using the formula (which we are calling a “property” of quadrilaterals) to come up with the circle part of the theorem.)

So yeah, we gave kids the ac=bd formula, but in relation to the diagonals of quadrilaterals. And we asked: “which quadrilaterals will this property hold for? We’ll call ’em blermions”

So I ask them to look at the standard quadrilaterals they know — investigating this property using a geogebra sheet — and having them making a conjecture about blermions.

01_Crossed_Diagonals__new__pdf__page_1_of_2_

The ggb sheet is here.

---_-_GeoGebraTube

So students play on geogebra and come up with some understandings (inductively) about which quadrilaterals are blermions. Then they make a conjecture about all blermions.

This conjecture will fail. Because it is based on students only looking at “nice” quadrilaterals. I want the conjecture to fail. I want to emphasize the point that looking at “nice” examples can often lead to blind spots in your logic.

Students will see it fail when they are asked to drag the four points to specific places (see #5 below). The quadrilateral that results is weird looking. There is nothing that seems special about it. But it does have ac=bd. It is a blermion. Their conjecture about blermions was wrong!

Now students are sent on a chase to find more blermions — and they are encouraged to not just look at “nice” quadrilaterals. They record their results. (If they are stuck, a teacher can have the students fix three points and only drag the fourth point; It turns out you will always be able to drag that point to have ac=bd… and that in fact you can find an infinite number of additional points by doing this dragging of that fourth point.)

01_Crossed_Diagonals__new__pdf__page_2_of_2_

At this point, once they have found lots of blermions, students are going to try to make another conjecture about all blermions. I wonder if any student is going to get it. It’s okay if they don’t. At this point, I’m going to have every student plot a different blermion (some “nice” quadrilaterals, but mostly not nice ones). Then I’m going to have them pick any three points and change the color of them. Finally, I’m going to have students go to the “draw a circle with three points” tool, and be surprised by the fact that the circle always goes through that fourth uncolored point.

Why is this good? I hope they don’t get it. Because seeing that every blermion works like this (a circle goes through all four vertices of the blermion) is the key wow factor for kids. It’s strange, because even though I will be giving away this key fact, I think all this play will make this key fact interesting and weird. [2] Once they all see that, they are going to be curious as to how circles even got involved with these quadrilaterals in the first place. And… that is perfect… because then the kids are going to want to know why this happened.

And then we can transition to figuring out how to prove this. Because suddenly the crossed chord theorem is weird and strange and unexpected, and suddenly we kinda want to know why it works!

[1] We had to decide whether students should discover the property ac=bd for crossed chords. Motivating that from a circle and crossed chords was hard. We needed kids to somehow see similar triangles (which felt like we would be giving away too much) or come up with the multiplication idea of the pieces of chords on their own. We had ways to motivate that multiplication, but they weren’t elegant. So we scrapped that.

[2] Here’s the thing. Most things in geometry are presented to students in such a way that their wonderment about the geometric thing is killed. In a proof, the statement to be proved is given up front — and suddenly it isn’t interesting. It might be something really cool, but the exercise around doing the proof doesn’t highlight that. Or — as I’ve blogged before — theorems like the ones involving all the triangle centers… we tell kids to plot the perpendicular bisectors of all three sides of a triangle and they meet at a single point. It isn’t strange and wonderful. They don’t see why that’s weird. They just know we told them to plot the perpendicular bisectors, and they know something will happen because why else would we have them do it? We kill the wonderment of geometry in so many ways.

I want the weirdness and unexpected and unintuitiveness to come back to geometry… that’s where the beauty and curiosity are… and only then have my students work on figuring out why the unexpected happens… and get to the point where the weird and unexpected and unintuitive become obvious and natural. Making the unnatural natural. Yup, that’s the goal. But to do that, you have to first get to the unnatural.

Do Kids Really Understand Trigonometry once Sine/Cosine/Tangent are Introduced?

This year I’ve been doing a lot of work with my geometry kids to get them to build up a deeply conceptual understanding of trigonometry. Right now we’re still in the part of the unit where the the terms sine/cosine/tangent haven’t been introduced, and kids are building up their understanding by thinking of ratios in specific triangles. But soon we are going to introduce the terms, and I’m afraid they are going to go to their calculator and use it blindly, and forget precisely what sine, cosine, and tangent really mean.

For my kids, at this level, I want each term to be a ratio generates a class of similar triangles — which all look the same, but have different sizes. And I want kids to conjure that up, when they think of \sin(40^o)=0.6428
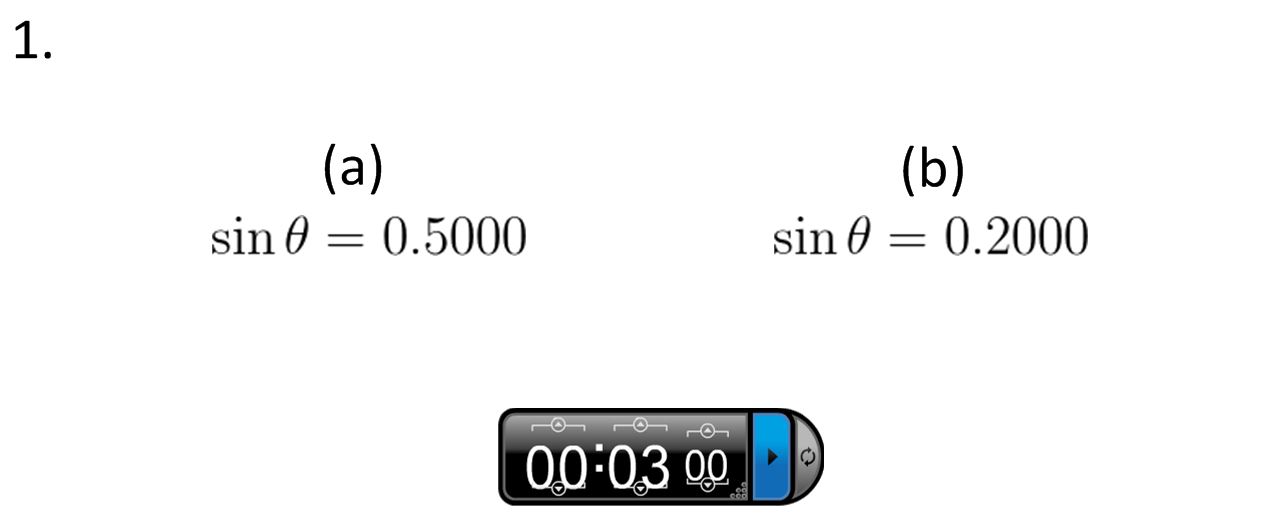
. But I fear that 0.6428 will stop losing meaning as a ratio of sides… that 0.6428 won’t mean anything geometric or visual to them. Why? Because the words “sine” “cosine” and “tangent” start acting as masks, and kids start thinking procedurally when using them in geometry.

So here’s the setup for what we’re going to do.

Kids are going to be placed in pairs. They are going to be given the following scorecard:

scoresheet

They will also be given the following sheet, with a clever title (the Platonic part refers to something we’ve talked about before… don’t worry ’bout it) (.docx form). This sheet has a bunch of right triangles, with 10, 20, 30, … , 80 degree angles.

placement

Then with their first partner, on the front board, I project:

proj1

The kids will have 3 minutes to discuss how they’re going to figure out which two triangles/angles best “fit” these trig equations. (I’m hoping they are going to say, eventually, something like “well the hypotenuse should be about twice the length of the opposite leg, so that looks a lot like triangle C in our placemat” for the first equation.)

They write down their answers. If they finish early, I have additional review questions from the beginning of the year that will be worth some number of points — to work on individually.

When time is up, they move to a new chair (in a particular way) so that everyone has a new partner. I throw some other equations up. And have them discuss and respond. Then they move again, and have new equations up.

I’ve scaffolded the equations I’m putting up in a particular way — so I’m hoping they lead to some good discussions. And I’m hoping as soon as a few people catch onto the whole “let’s compare side lengths” approach, the switching will allow for more discussion — so soon everyone will have caught on.

At the end of the game, we’ll have some discussion, and through those discussions we’ll reveal the answers. And of course, the student with the most correct answers will win some sort of fabulous prize.

The questions I’m going to ask are here:

The discussion questions are here:

Fin.

I’m super excited to try this out on my kids next week sometime.

A Semi-Circle Conjecture

At the very start of the school year in geometry, we started by having students make observations and write down conjectures based on their observations. We had a very fruitful paper folding activity, which students — through perseverance and a lot of conversation with each other — eventually were able to explain.

However we also gave out the following:

And students made the conjecture that you will always get a right angle, no matter where you put the point. But when they tried explaining it with what they knew (remember this was on the first or second day of class), they quickly found out they had some trouble. So we had to leave our conjecture as just that… a conjecture.

However I realized that by now, students can deductively prove that conjecture in two different ways: algebraically and geometrically.

Background:

My kids have proved* that if you have two lines with opposite reciprocal slopes, the lines must be perpendicular (conjecture, proof assignment).
My kids have derived the equation for a circle from first principles.
My kids have proved the theorem that the inscribed angle in a circle has half the measure of the central angle (if both subtend the same arc) [see Problem #10]

Two Proofs of the Conjecture

Now to be completely honest, this isn’t exactly how I’d normally go about this. If I had my way, I’d give kids a giant whiteboard and tell ’em to prove the conjecture we made at the start of the year. The two problems with this are: (1) I doubt my kids would go to the algebraic proof (they avoid algebraic proofs!), and part of what I really want my kids to see is that we can get at this proof in multiple ways, and (2) I only have about 20-25 minutes to spare. We have so much we need to do!

With that in mind, I crafted the worksheet above. It’s going to be done in three parts.

Warm Up on Day 1: Students will spend 5 minutes refreshing their memory of the equation of a circle and how to derive it (page 1).

Warm Up on Day 2: Students will work in their groups for 8-10 minutes doing the geometric proof (page 2).

Warm Up on Day 3: Students will spend 5-8 minutes working on the algebraic proof (page 3). Once they get the slopes, we together will go through the algebra of showing the slopes as opposite reciprocals of each other as a class. It will be very guided instruction.

Possible follow-up assignment: Could we generalize the algebraic proof to a circle centered at the origin with any radius? What about radius 3? What about radius R? Work out the algebra confirming the our proof still holds.

Special Note:

Once we prove the Pythagorean theorem (right now we’re letting kids use it because they’ve learned it before… but we wanted to hold off on proving it) and the converse, we can use the converse to have a third proof that we have a right angle. We can show (algebraically) that the square of one side length (the diameter of the semi-circle) has the same value as the sum of the squares of the other two sides lengths of the triangle. Thus, we must have a right angle opposite the diameter!

I’m sure there are a zillion other ways to prove it. I’m just excited to have my kids see that something that was so simply observed but was impossible to explain at the start of the year can yield its mysteries based on what they know now.

The two semi-circle conjecture documents in .docx form: 2014-09-15 A Conjecture about Semicircles 2015-03-30 A Conjecture about Semicircles, Part II

*Well, okay, maybe not proved, since they worked it out for only one specific case… But this was at the start of the year, and their argument was generalizable.

My Introduction to Trigonometry Unit for Geometry

I’ve been mulling over how to introduce trigonometry to my geometry students. I think I’ve finally figured out a way that is going to be conceptually deep, and will have kids see the need for the ratios.

I don’t know if all of what I’m about to throw down here will make sense upon first glance or by skimming. I have a feeling that the flow of the unit, and where each key moment of understanding lies, all comes from actually working through the problems.

But yeah, here’s the general flow of things:page

Kids see that all right triangles in the world can be categorized into certain similarity classes… like a right triangle with a 32 degree angle are similar to any other right triangle with a 32 degree angle. So we can exploit that by having a book which provides us with all right triangles with various angle measures and side lengths. (A page from this book is copied on the right.) Using similarity and this book of triangles, we can answer two key questions. (1) Given an angle and a side length of a right triangle, we can find all the other side lengths. (2) Given two side lengths of a right triangle, we can find an angle.

By answering these questions (especially the second question), kids start to see how important ratios of sides are. So we convert our book of right triangles into a table of ratios of sides of right triangles. Students then solve the same problems they previously solved with the book of triangles, but using this table of values.

Finally, students are given names for these ratios — sine, cosine, and tangent. And they learn that their calculator has these table of ratios built into it. And so they can use their calculator to quickly look up what they need in the table, without having the table in front of them. Huzzah! And again, students solve the same problems they previously solved with the book of triangles and the table of values, but with their calculators.

Hopefully throughout the entire process, they are understanding the geometric understanding to trigonometry.

(My documents in .docx form are here: 2015-04-xx Similar Right Triangles 1 … 2015-04-xx Similar Right Triangles 2 … 2015-04-xx Similar Right Triangles 2.5 Do Now … 2015-04-xx Similar Right Triangles 3 … 2015-04-xx Similar Right Triangles 4)

It’s a long post, so there’s much more below the jump…

(more…)

Angle Bisectors of a Triangle and the Incenter (and lots and lots of Salt)

In Geometry, we’re about to embark on the whole triangle congruence bit (SSS, SAS, ASA, etc.).  Below is the plan we have outlined.

The TL;DR version: By learning about angle bisectors, we motivate the need for triangle congruence. We have students figure out when they have enough information to show two triangles are congruent. They use this newfound knowledge of triangle congruence to prove basic things they know are true about quadrilaterals, but have yet to prove that they are true. Finally, we return back to angle bisectors, and show that for any triangle, the three angle bisectors always meet at a point. As a cherry on the top of the cake, we do an activity involving salt to illustrate this point.

***

STEP 1: To motivate the need to figure out when we can say two triangles are congruent when we have limited information, we are showing a problem where triangle congruence is necessary to make an obvious conclusion. 

We’re going to see the need for triangle congruence to show that:

any point that is equidistant to an angle (more precisely: the two rays that form an angle) lies on the angle bisector of that angle.

This will be an obvious fact for students once they create a few examples. But when they try to prove it deductively, they’ll hit a snag. They’ll get to the figure on the left, below. But in order to show the congruent angles, they’ll really want to say “the two triangles are congruent.” But they don’t have any rationale to make that conclusion.

Hence: our investigation in what we need in order to conclude two triangles are congruent.

When kids do this, they will also be asked to draw a bunch of circles tangent to the angles. All these centers are on the angle bisector of the angle. This will come up again at the end of our unit.

fig3

Kids will be doing all of this introductory material on this packet (.docx)

STEP 2: Students discover what is necessary to state triangle congruence.

This is a pretty traditional introduction to triangle congruence. Students have to figure out if they can draw only one triangle with given information — or multiple triangles.

We’re going to pull this together as a class, and talk about why ASA and SAS and SSS must yield triangle congruence — and we’ll do this when we talk about how we construct these triangles. When you have ASA, SAS, SSS, you are forced to have only a single triangle.

I anticipate drawing the triangles in groups, and pulling all this information together as a class, is going to be conversation rich.

The pages we’re going to be using are below (.docx) [slight error: in #4, the triangle has lengths of 5 cms, 6 cms, and 7 cms]

STEP 3: Once we have triangle congruence, we’re going to use triangle congruence to prove all sorts of properties of quadrilaterals.

Specifically, they are going to draw in diagonals in various quadrilaterals, which will create lots of different congruent triangles. From this, they will be asked to determine:

(a) Can they say anything about the relationship between one diagonal and the other diagonal (e.g. the diagonals bisect each other; the diagonals always meet at right angles)

(b) Can they say anything about the relationship between the diagonals and the quadrilateral (e.g. one diagonal bisects the two angles)

(c) Can they conclude anything about the quadrilateral itself (e.g. the opposite sides are congruent; opposite angles are congruent)

We have a few ideas percolating about how to have students investigate and present their findings, but nothing ready to share yet. The best idea we have right now is to have students use color to illustrate their conclusions visually, like this:

fig12

STEP 4: This is a throwback to the very start of the unit. Students will prove that in any triangle, the angle bisectors will always meet at a single point.

Here are the guiding questions (.docx)

And we will finish this off by highlighting the circles we drew at the start of the unit. Notice we have a single circle that is tangent to all three sides of the triangle. The center of that circle? Where the angle bisectors meet. Why? You just proved it! That location is equidistant to all three sides of the triangle.

fig5

STEP 5: The reason we’re highlighting these circles is that we’re going to be cutting out various triangles (and other geometric shapes) out of cardboard, elevate them, and then pour salt on them. Ridges will form. These ridges will be angle bisectors. Why? Because each time you pour salt on something flat, it forms a cone. The top of the cone will the the center of the circle. We’re just superimposing a whole bunch of salt cones together to form the ridges.

The other geometry teacher and I both saw this salt activity at the Exeter conference years ago. Here are some images from a short paper from Troy Stein (who is awesome) on this:

The general idea for this activity is going to be: kids take a guess as to where the ridges are going to be, kids pour the salt and see where the ridges are.

As the figures get more complex, they should start thinking more deeply. For example, in the quadrilateral figure above, why do you get that long ridge in the middle?

My hope is that they start to visualize the figures that they are pouring salt on as filled with little cones, like this:

fig10

The material I’ve whipped up for this is here (.docx):